How to See the Automation Details?
Node defines the failure/success of an iteration, that is why the team has marked the nodes with color.
| Color | Description |
| Blue | Node Executing |
| Red | Node Failed |
| Green | Node Executed |
| Grey | Yet to Execute |
To see the automation details:
- Select Account from the drop-down list.
- Select Automation Name from the drop-down list.
- Click Go.
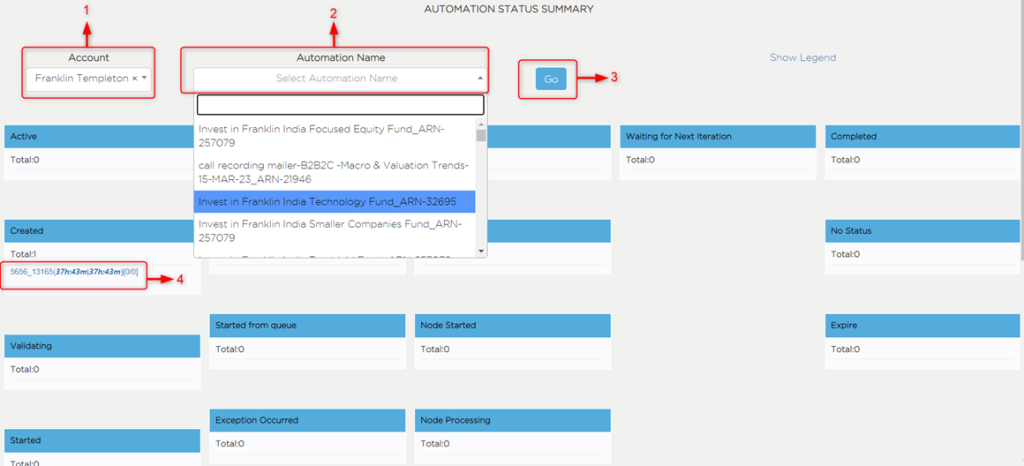
This takes you to the Automation Details and Automation Journey page, where you can they both in details.

- Click Show Users to see the total users entered in this automation.
- This indicates the number of the iteration. Each iteration is defined by a number.
- The indicates the iterations that have error.
- The dot in red color indicates that the node is a Failed Node. You see the iteration 263 is in under Error in Iteration section, now the node: 263 has a red mark which means the Node Failed.
- Select the date from the drop-down to view iteration.
- Click Go, view the iteration details.
- This displays the Iteration Status of the date you have selected.
- Click Automation Journey to see the journey of an automation. For example, you can see the iteration failed in red color – click on it. This shows why exactly the iteration failed (the reason).
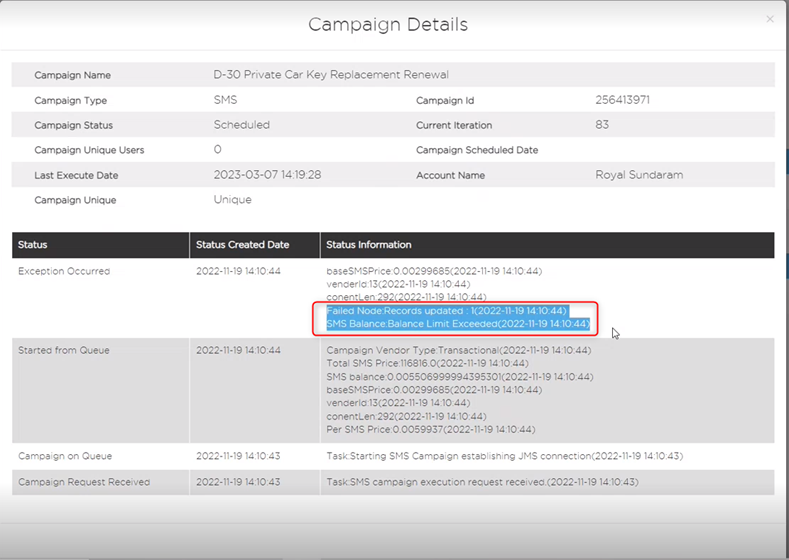
- Now, click on the node which is red market (failed node). This re-directs you to campaign log dashboard, where you can see why the node failed. For example – here, the node failed due to SMS Balance Limit Exceeded.
- Click Automation Details to see all the details of automation.
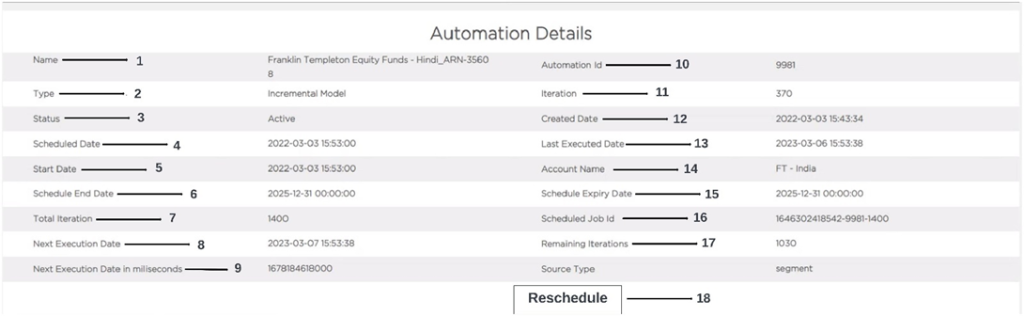
Name: This indicates Name of the Automation.
Type: This indicates the type of the automation. There are two types:
- Incremental Model
- All Users
Status: This indicates the current status of the automation. For example, active means it is still running.
Scheduled Date: This indicates the schedule date – date/time, the automation is scheduled to run next.
Start Date: This indicates the automation start date.
Scheduled End Date: This indicates the scheduler end date.
Total Iteration: This indicates the total number of iterations. For example, 1400.
Next Execution Date: This indicates the Next Execution Date.
Next execution Date in Milliseconds: This indicates the Next Execution Date in milliseconds (time).
Automation ID: This indicates the Automation ID. For example, 9981.
Iteration: This indicates the number of iterations completed till date. For example, 370.
Created Date: This indicates the created date with particular time.
Last Executed Date: This indicates the Last Executed Date along with time of execution.
Account Name: This indicates the Account Name.
Schedule Expiry Date: This indicates the Schedule Expiry Date. The expiry date of the scheduler.
Scheduled Job ID: This indicates the Scheduled Job ID.
Remaining Iterations: This indicates the Remaining Iterations to be completed. For example, 1030.
Concept: Total iteration – Iteration Completed = Remaining Iteration.
For example,
| Total number of iterations = 1400 Iteration completed = 370 Remaining: 1400 – 370 = 1030 |
Source Type: This indicates the source type. For example, here the source type is segment.
Reschedule: This indicates the Reschedule. If the Next Iteration failed, you can reschedule from here.
| Important Every time Waiting for Next Iteration failed or the time set for the next iteration crossed – if the iteration time shows in red color (for example. – 24h: 33m), you can opt for Reschedule. There is a Reschedule option on this page – click to re-schedule. |