How to Set up a Web Push Campaign?
Web Push is a very effective channel of communicating with users when they visit a website or a microsite. To setup a Web Push campaign:
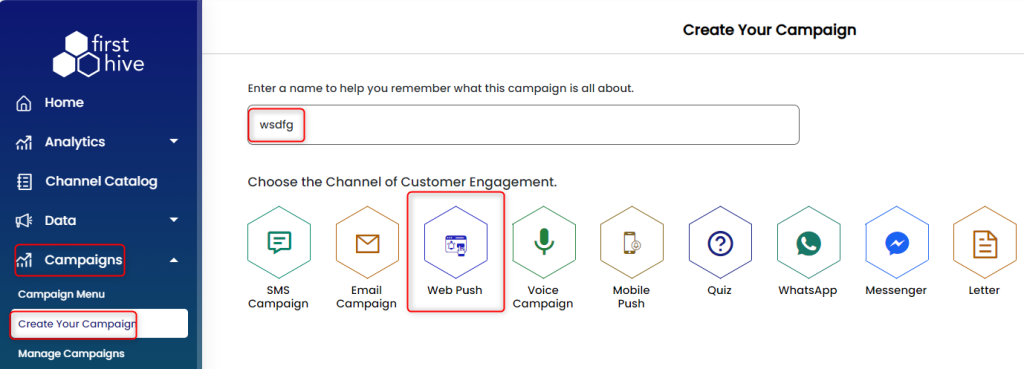
- Login to FirstHive >> Click Campaign >> Click Create Your Campaign
- Enter the name for your Web Push campaign.
- Click on the Web Push icon.

- Select the subtype. There are 3 types of Web Push campaign that you can do in FirstHive:
- Web Pop-up
- Web Banner
- Web Notifications
Let us go through each one of them in detail.
Web Pop-Up
This channel allows you to trigger a pop up when the user opens the respective website page based on the rules you configure.
Pop-Up can consist of Image or Text or Form or Buttons that would take the user to a respective page.
Some popular use cases of web pop-up are reminders, alerts, opt-in permissions, announcements, etc.
While designing pop up from the front end, you have to follow the steps below:
- Select the format – Text/Image/Form.
- Enter Content (Only if you selected text).
- Add Link (This will take the user to the respective page).
- Content Tags (Add a natural language tag so that all users who participate in this campaign get this tag in their profile. Example: ActivationCampaignJune2020).
- Select Position (You can choose the position where the pop up should appear. In case you want a position, which is not available in the front end, please speak to your respective Customer Success Manager).
- Select Background Color (You can choose your brand colors with the help of Color picker).
- Select Text Color (You can choose your brand colors with the help of Color picker).
- AutoClose Time (In Seconds).
- Frequency (Here you can enter the frequency in Day/Month/Year. If you need to customize the frequency, please speak to your respective Customer Success Manager).
- Image (If you have selected image, upload the image of size 300 x 300 pixels. If you need to customize the image size, please speak to your respective Customer Success Manager).
- Form list (In case you want to populate the form, please speak to your respective Customer Success Manager).
Web Banner
This channel allows you to trigger a Banner when the user opens the respective website page based on the rules you configure.
While designing Banner from the front end, you have to follow the steps below:
- Select the Site Name where you want the banner to appear.
- Enter Content (Only if you selected text).
- Add Link (This will take the user to the respective page).
- Content Tags (Add a natural language tag so that all users who participate in this campaign get this tag in their profile. Example: ActivationCampaignJune2020).
- Select Position (You can choose the position where the pop up should appear. In case you want a position which is not available in the front end, please speak to your respective Customer Success Manager).
- Select Background Color (You can choose your brand colors with the help of Color picker).
- Select Text Color (You can choose your brand colors with the help of Color picker).
- Frequency (By default the banner would be pushed instantly as soon as you click on ‘Execute’ Button. If you need to customize the frequency, please speak to your respective Customer Success Manager).
A banner can consist of an Image with a link that would take the user to a respective page. However, this would need customization. Please speak to your respective Customer Success Manager to get the customization done.
Some popular use cases of Web Banner are Promotions, announcements, etc.
Web Notification
This channel allows you to push notification to your user when the user opens the respective website page based on the rules you configure.
|
While designing Banner from the frontend, you have to follow the steps below:
- Select the Site Name where you want the banner to appear.
- Enter Title that you want to appear (The limit is 50 characters).
- Content Tags (Add a natural language tag so that all users who participate in this campaign get this tag in their profile. Example: ActivationCampaignJune2020).
- Enter Content (Only if you selected text).
- Add URL/Link (This will take the user to the respective page).
- Upload Logo – Here you have to upload the Brand Logo or Program Logo.
- Upload Banner – Here you have to upload the Banner in dimensions of 600 (width) x 300 (height) pixels.
- Frequency (By default the banner would be pushed instantly as soon as you click on ‘Execute’ Button. If you need to customize the frequency, please speak to your respective Customer Success Manager).
Once you have set up the above, you can go ahead and select the audience you want to target this notification. For any customization on the audience, please speak to your respective Customer Success Manager.
On the preview screen, you can select to execute immediately or you can come back to this campaign from Manage Campaign screen. If you are setting up the campaign for the first time, make sure you design the campaign with the guidance of the Customer Success Manager.
