This document describes the steps to be followed to integrate FirstHive Analytics SDK in your React Native Android & iOS application
─
Prerequisite:
A ‘site ID’ need to be created for your APP in your FirstHive account to map the tracking to your account. Contact your FirstHive rep for the Site ID if not already provided
Steps to Integrate FirstHive Android SDK
1. Including the library
iOS
- Add node_modules/react-native-matomo/ios/BNFMatomo.xcodeproj to your xcode project, usually under the Libraries group.
- Add libBNFMatomo.a (from Products under BNFMatomo.xcodeproj) to build target’s Linked Frameworks and Libraries and Target Dependencies lists.
- If this Tracker is the first Swift library in your project, you need to add a random .swift file to your project.
- In your main target set the Swift version to 4.2.
Android
- Open /android/settings.gradle
- Below include ‘:app’ add:
include ':react-native-matomo'
project(':react-native-matomo').projectDir = new File(rootProject.projectDir, '../node_modules/react-native-matomo/android/')
- Open android/app/build.gradle
- Add the following under dependencies:
compile project(':react-native-matomo') - Open your MainApplication.java file under android/src
Import the lib using import de.bonify.reactnativematomo.MatomoPackage;
Add the following new MatomoPackage() to the getPackages function
2. Tracker Usage
Init tracker
Before using any function below, the tracker must be initialized.
Matomo.initTracker(‘https://www.firsthive.com/engage/piwik/piwik.php’, <Replace with SiteID>);
|
Custom Dimensions
The Matomo SDK currently supports Custom Dimensions for the Visit Scope. Using Custom Dimensions you can add properties to the whole visit, such as “Did the user finish the tutorial?”, “Is the user a paying user?” or “Which version of the Application is being used?” and such? Before sending custom dimensions, please make sure they are properly installed and documented. You will need the ID of your configured Dimension.
After that you can set a new Dimension,
Matomo.setCustomDimension(1, 'abc');
|
Or remove an already set dimension.
Matomo.setCustomDimension(1, null);
|
|
|
Reserved Dimension:
The reserved dimension includes:
Matomo.setCustomDimension(1, 'Email'); Matomo.setCustomDimension(2, 'Mobile No'); Matomo.setCustomDimension(3, 'User Name'); Matomo.setCustomDimension(4, 'Name'); Matomo.setCustomDimension(5, 'DeviceID') |
|
Track Screen Views
To send a screen view set the screen path and titles on the tracker.
Matomo.trackScreen('/your_activity', 'Title');
|
Track Events
To collect data about user’s interaction with interactive components of your app, like button presses or the use of a particular item in a game use trackEvent.
Matomo.trackEvent('category', 'action', 'name', 1000);
|
Sample Implementation:
To track a login event, where a mobile number is entered as a user id, you can track the event and set the custom dimension to pass the user PII.
Matomo.setCustomDimension(2, 'Mobile No'); Matomo.setCustomDimension(5, 'DeviceID'); Matomo.trackEvent('Loginops', 'Login', 'login', 1000); |
3. Activate Mobile Push
Prerequisite:
Set up a Firebase Cloud Messaging client app in your Android APP: https://firebase.google.com/docs/cloud-messaging/android/client.
You can setup Mobile Push campaign in FirstHive and push it in your app via an API integration method as described below:
Step 1: Implement the below API in your app to push the required details, for each user
URL: https://firsthive.com/engage/mobile/doAppUserSubscription
Method: POST
Parameters:
| Parameter | Data Type | Description | Required |
| projectId | int | This indicates the <Site ID> provided by FirstHive. For example, “projectId”:”85″ | Yes |
| data | string | Email and/or Mobile number of the user for user identification.
For example, {“mobileNo”:”1234567890″,”email”:”[email protected]”}. |
Yes |
| regId | string | This indicates the FCM Token. For example, “regId”:”c3MyLdaDD7I:APA91bH-TO2aDrg6_-gl-MzEKrMfoAehnCpsnwmxc3TOv4MlUrIKRobRma5rVQvK
af1B3iR3xadzTDPxrO5yjlqsig1GGlzx00TUTnSJCTRfPyZjyWKcEpC1ilAclMccFJZH5oLoZvpg” |
Yes |
| visitId | string | This indicates the Visitor ID. For example, “visitId”:”dd49680dc9ab2c53″ | Yes |
| browser | string | The browser. For example, “browser”:”iOShybrid” | Optional |
How to Get the Visitor Id?
Below code will work only after the FirstHive sdk is executed in your app, hence place the code accordingly.
var visitor_id; _paq.push([ function () { visitor_id = this.getVisitorId(); }]); |
2. Share the Legacy Server Key with FirstHive
Follow the steps below:
- URL: https://console.firebase.google.com/project/
- Path to key in Firebase:
| Path: Project >> Project Settings >> Cloud Messaging >> Legacy Server Key |
Steps to Enable Tracking of ‘Opens’ for App Push Notifications.
When a user taps on the app push notification sent from FirstHive, it will pass a Message-ID to the app in the data payload in the following key.
messageId: <Unique value to identify the user and campaign>
Example below,
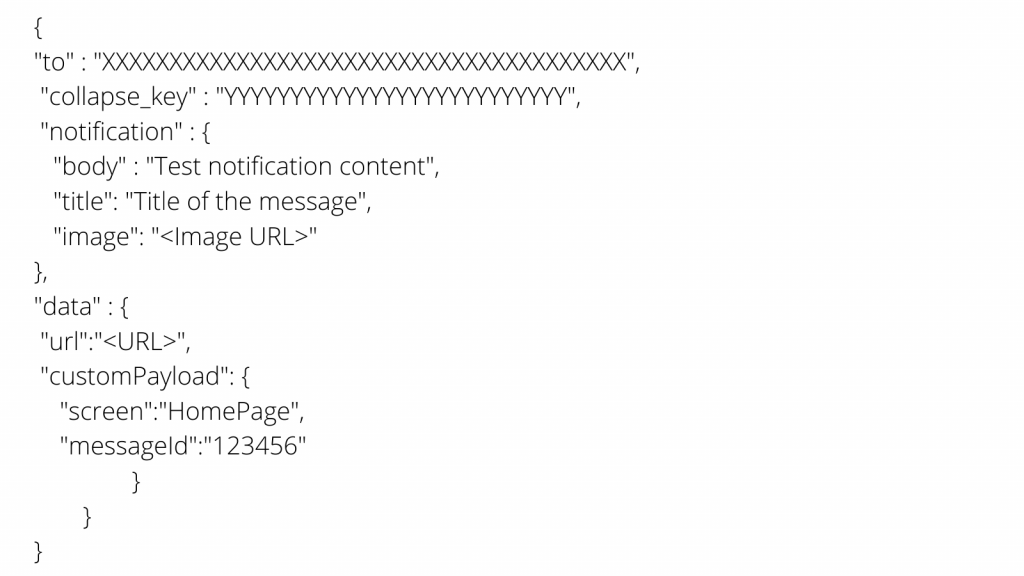
Whenever the app receives a value in the data payload for the above key, it should trigger the following API and pass the tracking ID back to FirstHive
URL: https://firsthive.com/engage/mobile/trackNotification
Method: POST
Parameters:
| Parameter | Data Type | Description | Required |
| authKey | string | XXXXXXXXXXXXXXXXX (will be shared separately for the account) | Yes |
| messageId | string | messageId to identify the user for the campaign, received in the custom payload section mentioned above | Yes |