Overview
Web Personalization is the process of creating customized experiences for online visitors when they land on your site. Rather than providing a single, broad experience, website personalization allows you to present visitors with unique experiences tailored to their needs and desires. You customize their experience based on their past purchases, their geography or behavior in a manner that serves multiple business purposes – higher customer satisfaction, longer visit duration, boosted site visits, lower bounce rate, better conversions, and an improved brand reputation.
In a nutshell, web personalization attempts to use data to take that same level of one-on-one attentiveness and translate it into the digital world.
Why Web Personalization is Crucial?
In an era where brands are competing every minute to grab user attention, personalization serves in their best interest. Telling your online visitors that you really care about their interests and preferences while providing them with relevant content/experience can make them spend more time on your website. Even help them take the desired action.
Many of them have grown accustomed to personalized experiences from their news feed, social network, and shopping recommendations. In fact, their expectation level has grown so high that brands who want to improve their offerings are gradually shifting their strategy to address them directly. In fact, personalization has become the #1 online technology investment priority among top brands in the business.
Mahindra is a classic example to quote here. One of the world’s leading and most popular automobile brand, Mahindra’s website personalization efforts aren’t new to us. You can’t help but scroll down till the end and marvel at its personalized recommendations.
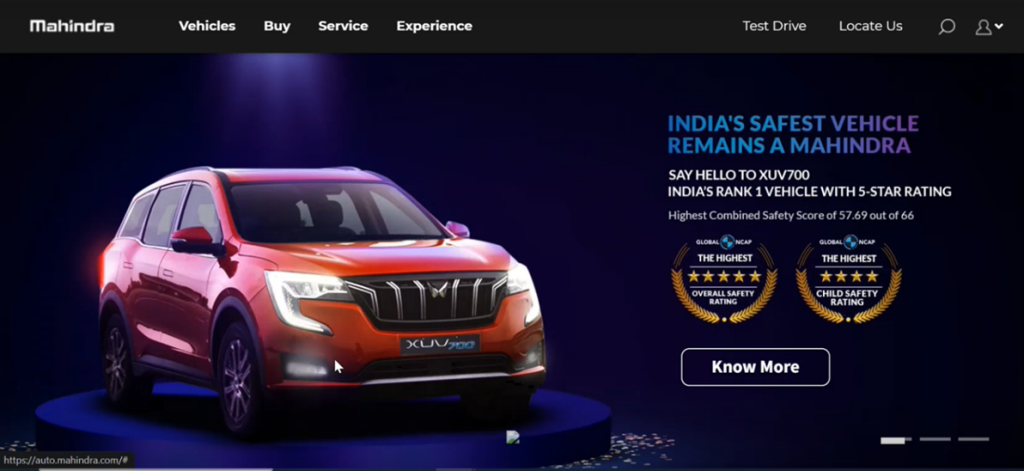
Mahindra takes note of every “if and buts” of a customer on its web platform. As you browse through the website, it jots down all the vehicles you browse through, the SUV that attracts you the most, the amount of time you spend on a particular model, and much more. Using such insights, it further personalizes your experience every time you land on its site and compels you to consider purchasing.
It requires in-depth research work followed by the right platform, finding the right tools to support your process, and testing your hypothesis before jumping to any personalization initiatives. That’s where FirstHive helps you to achieve your end goals.
How is Web Personalization Accomplished?
Advances in technology can directly resolve many of the above challenges. To be truly effective, website personalization requires several strategies seamlessly working together by:
⦁ Defining the Target Audience: This can be done by targeting visitors in real time based on the actions they take on your site (browsing different insurance schemes, searching for a high-end SUV, looking for a particular product, etc.,) as well as what you know about them with dynamic customer profiles (past behavior, stated preferences).
⦁ Providing Better Experiences: If you understand your visitors better, you can create compelling on-site experiences tailored to specific audiences that appeal to them.
⦁ Continuous Evaluation and Enhancement: You should constantly measure the outcome of your
Website Personalization. Not every personalized experience will resonate, so it’s important to always
understand how these experiences are performing and adjust accordingly.
How to Install the Code?
This Site Analytics code is placed in the <header> section of the website.
Copy the below code and paste it between the <header> and </head> of your website:
| <!– FirstHive Tag Manager –> <script type=“text/javascript”> var _mtm = _mtm || []; _mtm.push({‘mtm.startTime’ : (new Date()).getTime()), ‘event’: ‘mtm.Start’}); Var d=document, g=d.createElement(‘script’), s=d.getElementByTagName(‘script’)[0]; g.type=’text/javascript’; g.async=true; g.defer=true; g.src=’https://firsthive.com/engage/piwik/js/container_4H8yTD5y.js;s.parentNode.insertBefore(g,s); </script> <!– End FirstHive Tag Manager — > |
Setup
Download the service-worker.js file and upload the file into the root directory (root, or ‘/’) of your website.
What is FirstHive Tag Manager?
FirstHive Tag Manager lets you manage and unify all the tracking and matching tags. Tags are also known as snippets or pixels. Such tags are typically JavaScript code or HTML that lets you integrate various features into your site with just a few clicks. For example,
- Tracking Analytics Data
- Connection Tracking
- Newsletter Signups
- Exit Popups and Surveys
- Remarketing
- Social Widgets
- Affiliates
- Ads and more
The above can be achieved, using the main components that include:
- Tags: A snippet of code (JavaScript or HTML) which is added to your website
- Triggers: Defines when a tag should be fired.
- Variables: Lets you retrieve data which can be used by tags and triggers.
How Do I Get the Code?
Follow the steps mentioned below to get the site analytics code:
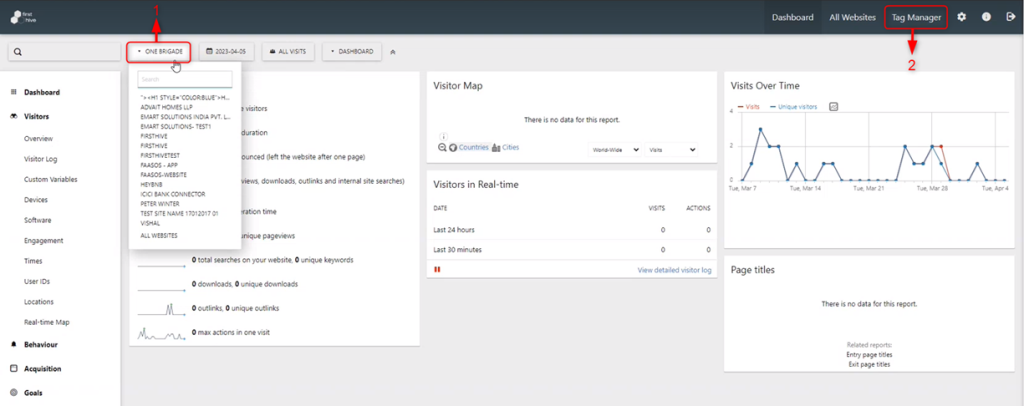
Go to the FirstHive Dashboard:
- Select the campaign. Enter the campaign name or search by campaign id.
- Click Tag Manger.
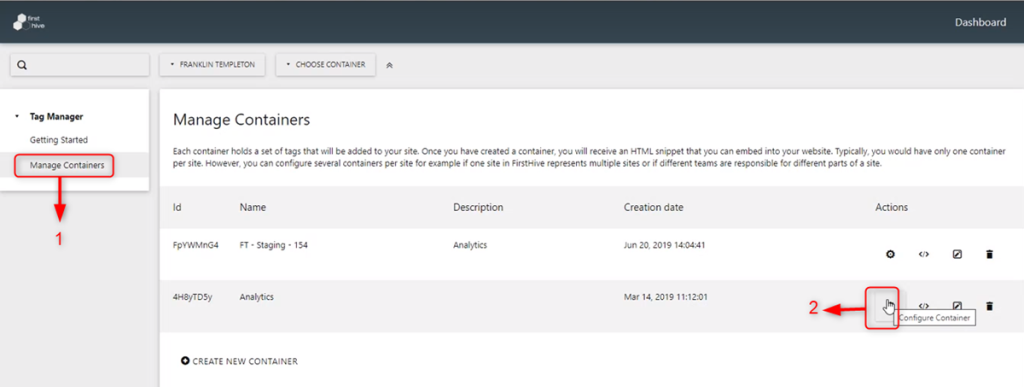
Under Tag Manager tab:
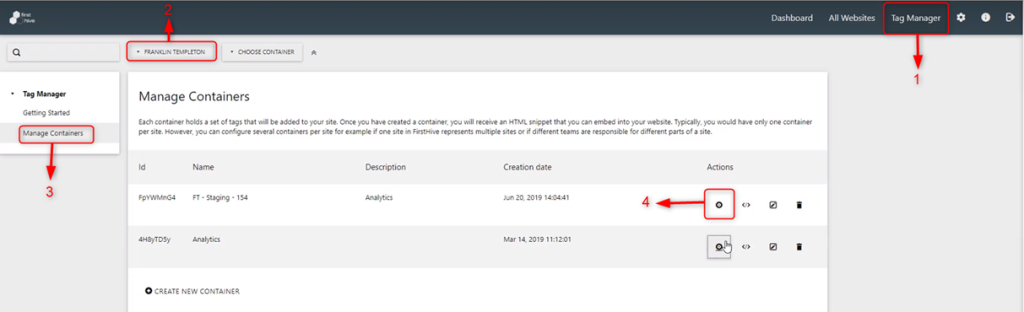
- Click Manage Containers.
- Click Setting icon to Configure Containers.
Now, click Install Code.
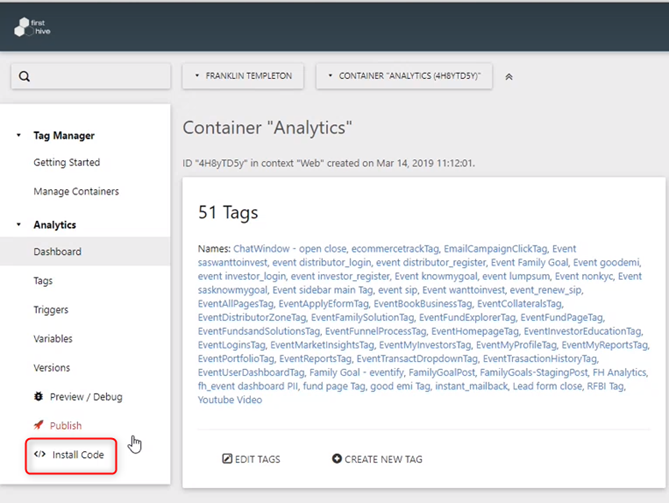
To install this container, copy and paste the code in the <header> part of every page in your site.
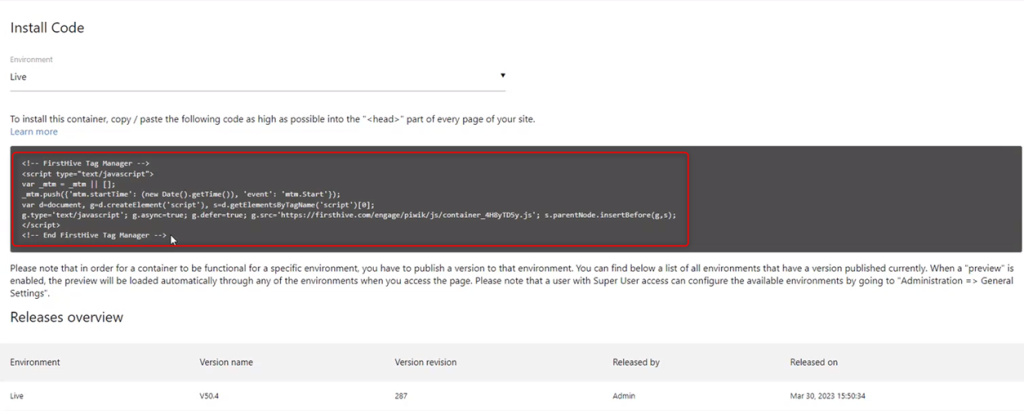
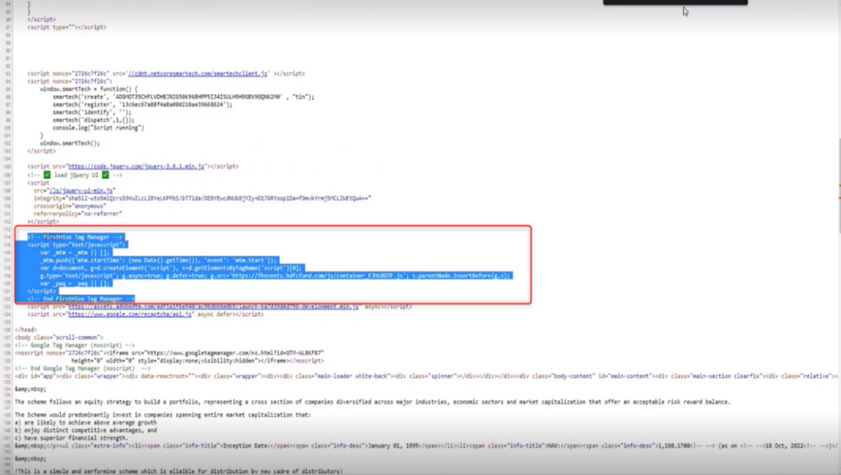
Here, you can see how the FirstHive Tag Manager Code is placed:
Once the Tag Manager Code is placed in the <header> part, you get default information such as:
- Page Clicks
- Searches
- Links
- Time spent on a particular page, etc.
How an Event is Triggered?
In order to check the event triggered in FH, you need to follow the steps mentioned below:
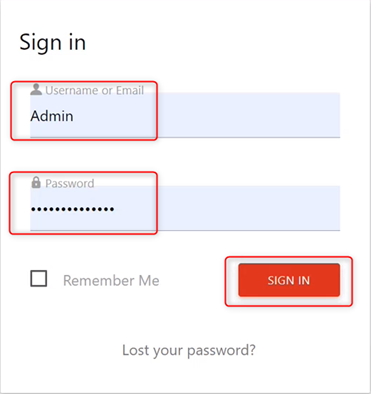
- Go to firsthive.com/engage/piwik/
- Enter your login credentials, click SIGN IN.
Now,
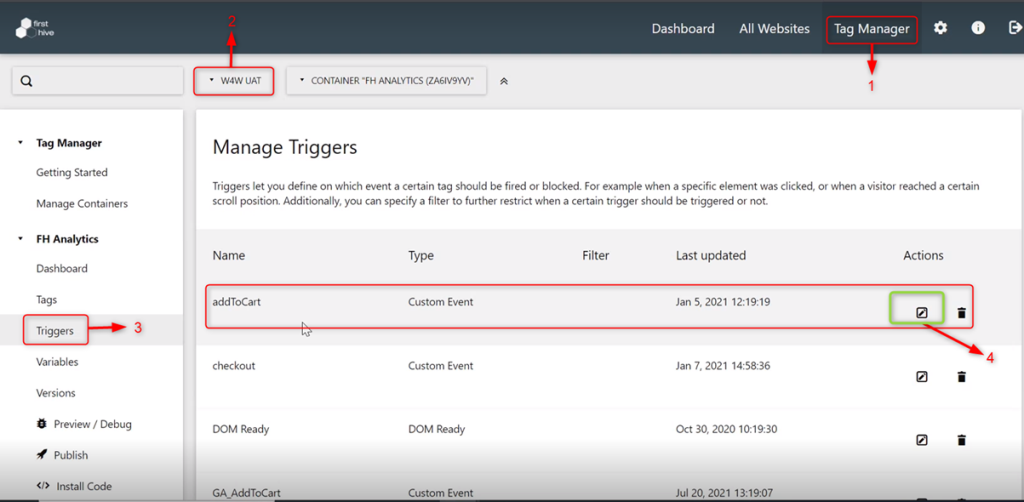
- Go to Tag Manager.
- Select the program. As you have logged in to wforwoman.com, so you need to select W4W UAT.
- Click Tiggers.
- You can see, the evet addToCart is called.
- Click Edit icon under Actions.
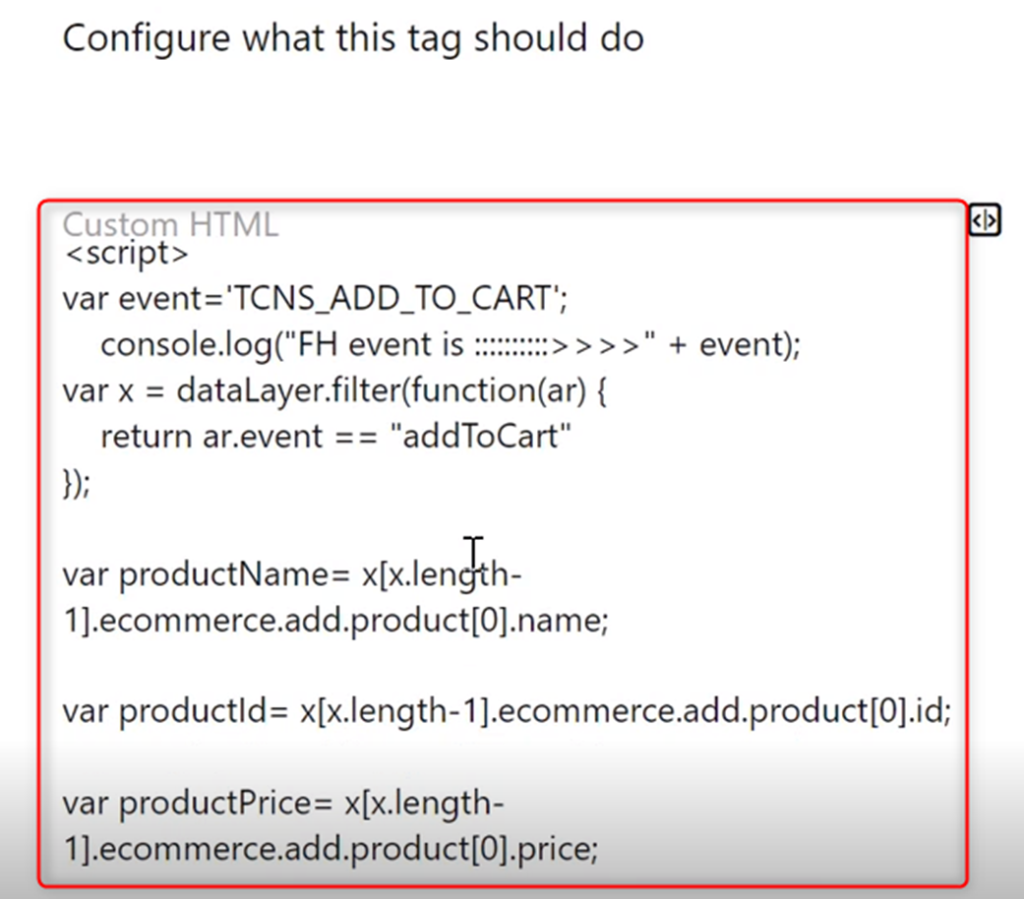
When the event name = addToCart is pushed into the data layer, FH tags are triggered. Then, this particular script will be called.
What Do You Mean by Custom Event?
A custom event is triggered when pushing into the data layer.
To add a custom event, you need to follow the steps mentioned below:
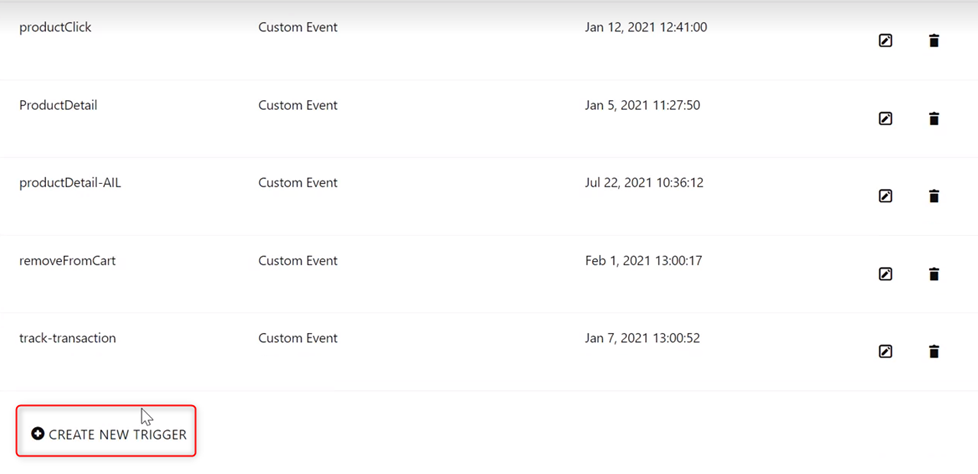
- Click CREATE NEW TRIGGER
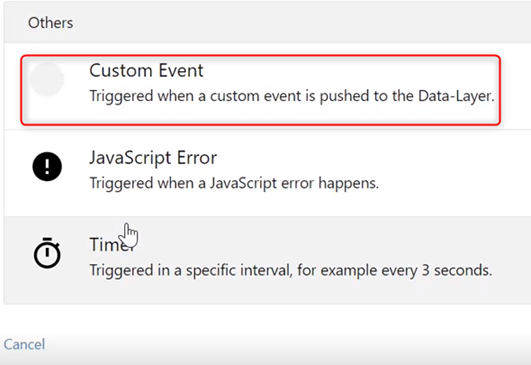
This will ask you to choose a trigger type and you need to define it as Custom Event.
How to Check the Events Captured?
To check the events captured, follow the steps mentioned below:
Go to the website and open the console:
- Click Application.
- Enter the visitor id in search box or search for visitor in the search box.
- Copy the visitor_id as displayed in the value section.

| NOTE visitor_id: The id created against a particular visitor. |
Now, go to FirstHive Dashboard:
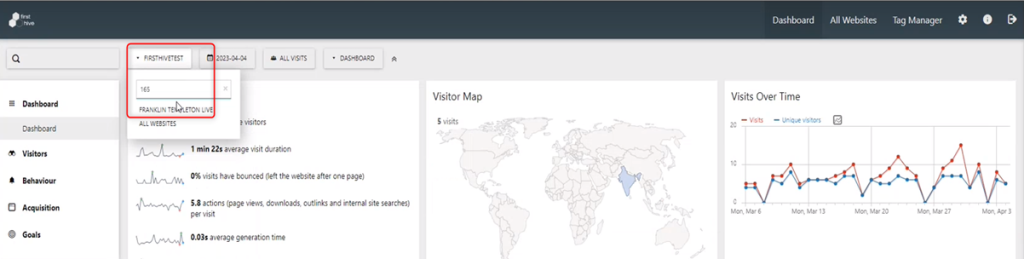
- Select the campaign from the drop-down or search by campaign _id/campaign name.
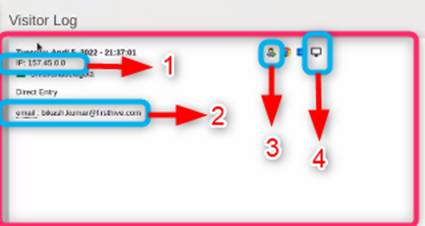
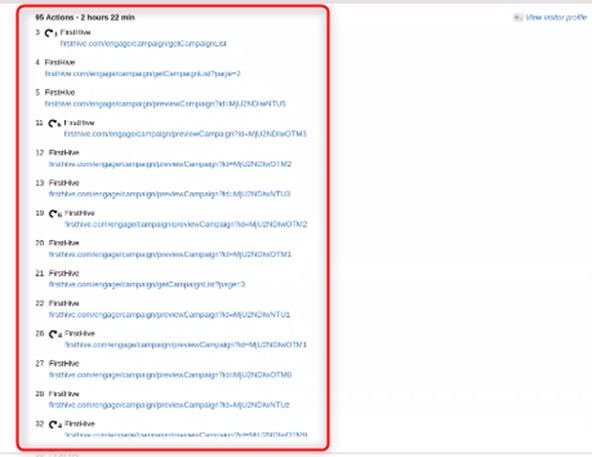
- Under Visitors tab, click Visitor Log.
- Then, click View Visitor Profile.
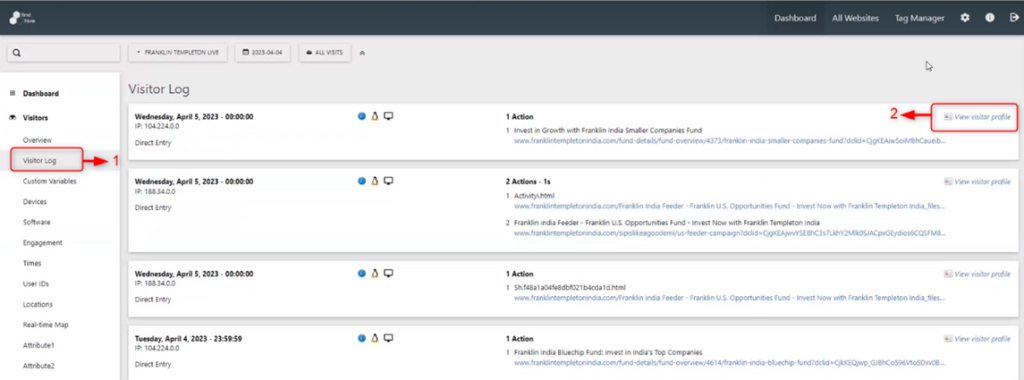
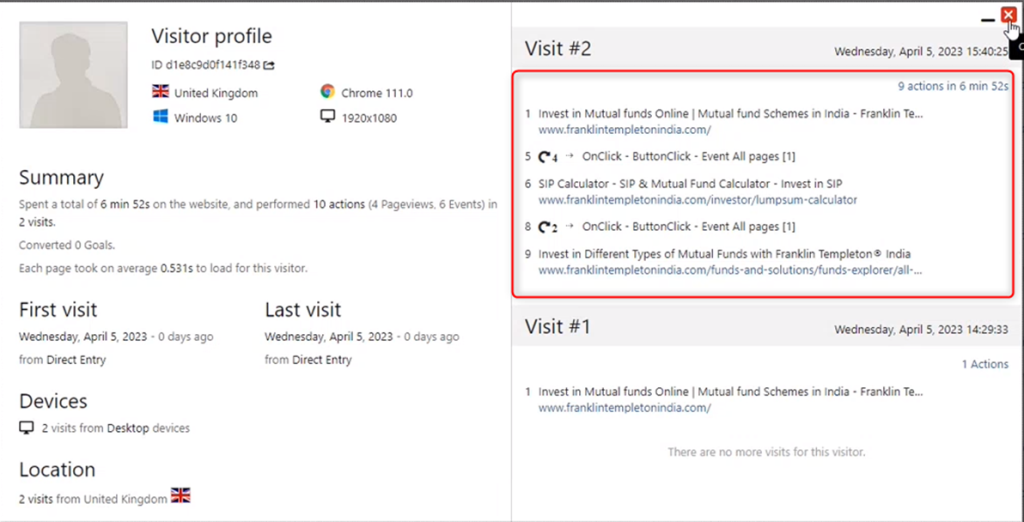
Here, you can see all the details related to a visitor’s profile. As shown in the screen below, replace the underlined section in the link with the copied visitor_id and click enter or just refresh the page. This will display the profile for that particular id only.
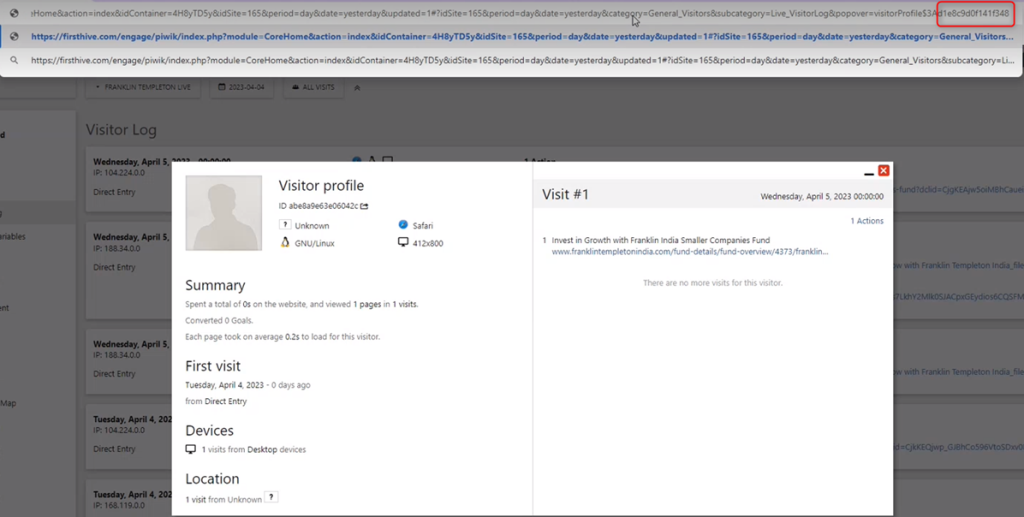
| Important For every visitor, the team creates a profile FH database. To check the profile, copy the visitor_id and paste in the link in place of the previous one. |
This will display the visitor’s profile for that particular id only.
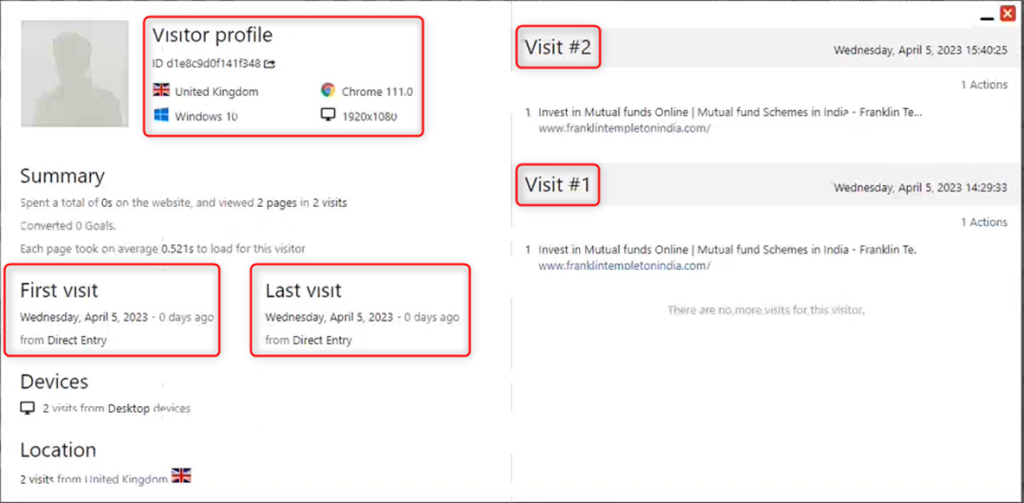
For example, a user login to franklintempletonindia.com and go to Funds & Solutions page and under Family Solutions category, he/she chooses All Funds.
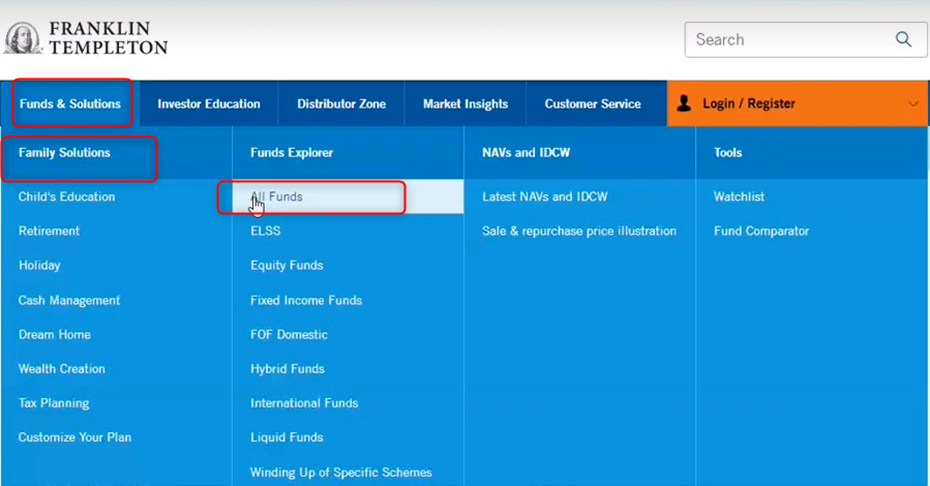
This will display all the pages visited by the user as shown in the screen.
Attributes
If you scroll down, you see attributes which is defined for certain visits and this is unique. In the screen below, you can see that the attribute is not defined for all the visitor profiles.
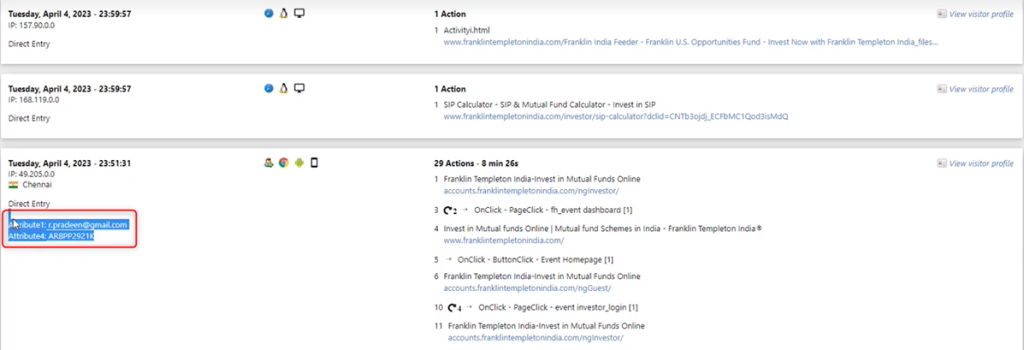
There are two levels that define the attribute:
- Visit Level: User login information. You can use this to determine which user has logged in.
- Action Level: Mapping info to that particular visitor id. Other details will be captured as well.
- Visit Level: To identify the user, the information is captured.
- Action Level: All the actions performed by the user.
- This is the Visit Level information. This shows the attributes captured.
- This is the Action Level information. The user’s login to the page and perform actions by click, to visit other pages. Here, you can see the Investor Login event is captured.
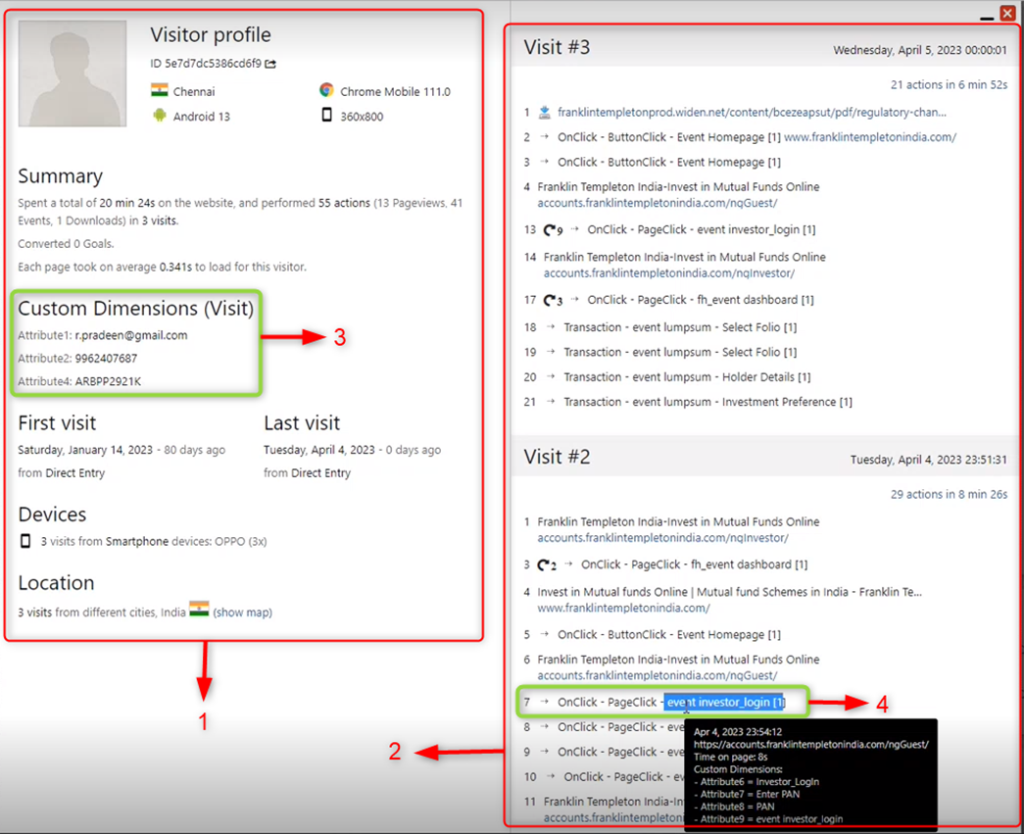
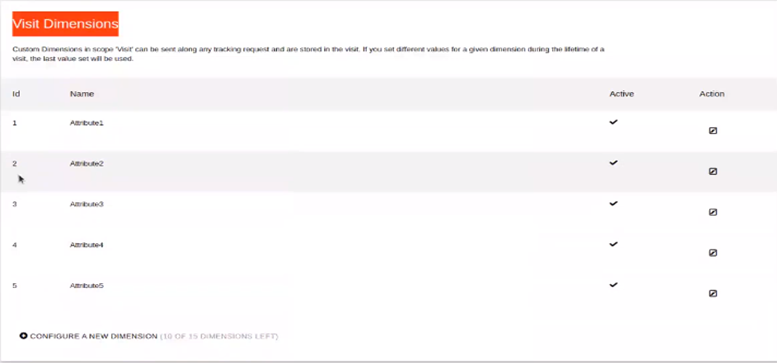
Visit Level
Let’s take an example to understand the Visit Level – a user comes to the website and login. As login is a one-time process, the user has to provide some kind of information like, email-id, phone number, etc., for that particular visit. In visit level, FirstHive captures user data such as:
- IP address
- Email id used to login
- User name
- The device logged in from, etc.
Visit Level (Flow)
Any account that FH creates, having Id – 1 to Id – 5 falls under the visit level. The visit level dimension is:
- Id 1
- Id 2
- Id 3
- Id 4
- Id 5
Action Level
For action level, this is Id – 6 to Id – 15.
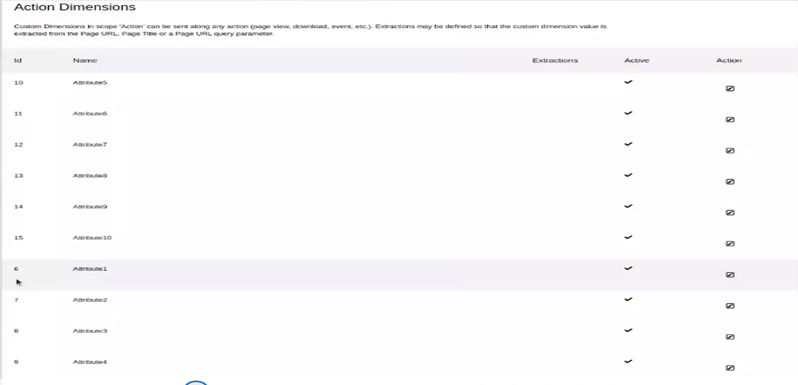
| NOTE If you pass any parameter against a visit level or dimension level, you need to make sure that one of these Ids get inserted. If you pass Id – 1 and some value, this will go to the visit level. In that particular event, if you pass Id – 10, then this will go to the action level. |
Action Level (Flow)
Action level shows the actions performed by the users while visiting a website. For example, a user comes to the website and then clicks on login, forgot password, etc., comes under action level.
How to Create Dimensions?
To create new a dimension, follow the steps mentioned below:
- Go to Settings.
- Click Custom Dimensions under Measurables.
- Create new dimensions either for Visit Dimensions or Action Dimensions.
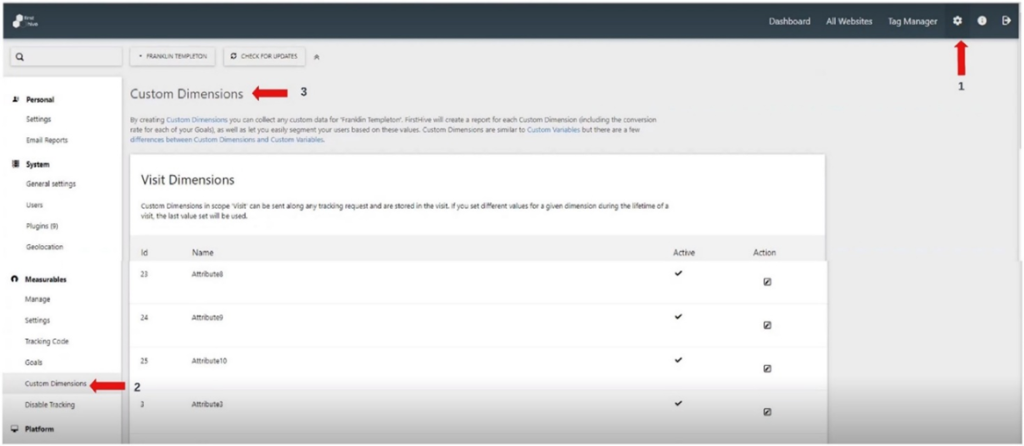
Here, you can see the dimensions:
What Do you Mean by Tags and Triggers?
Whenever a user comes to the website and login, a certain code is called in order to capture the information in FH Analytics, for that you need to create Tags and Triggers. For example, a user comes to Franklin Templeton website and clicks Login/Register as an Investor or Distributor.
- User enters the User ID
- Enters the Password.
- Click Next.
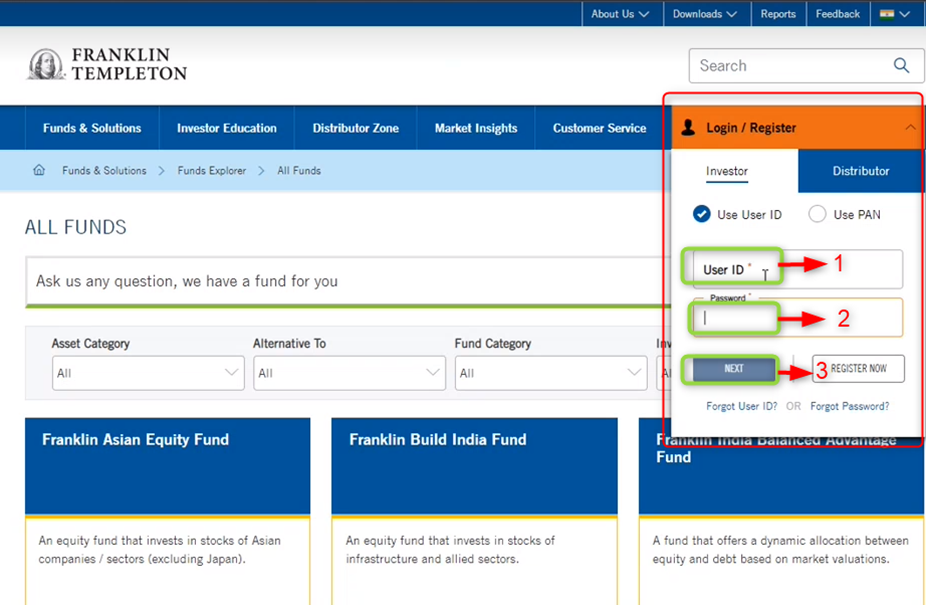
Once the user clicks Next button, a particular script is called to capture the information in FH Analytics, and for this the team needs to create tags and triggers.
How to Create Triggers?
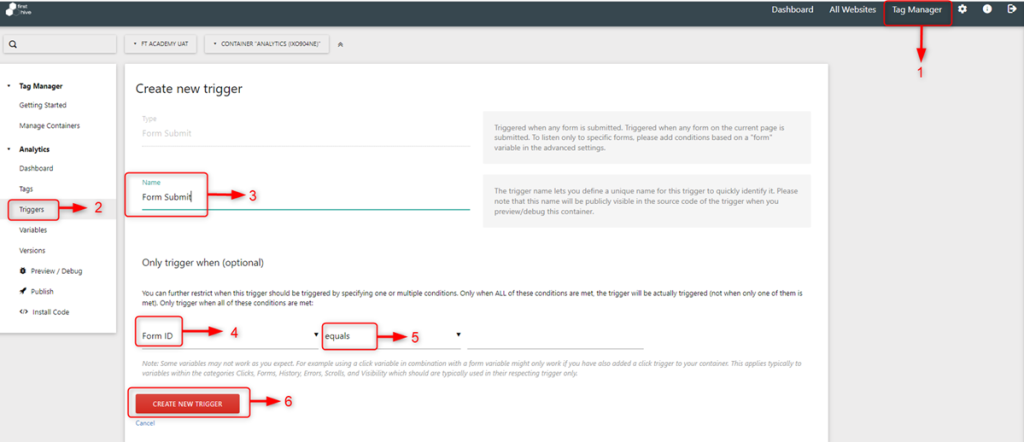
To create a trigger:
- Go to Tag Manager.
- Select the Trigger. This will display all the triggers and you have to select a trigger type. For example, Form Submit.
- In the Name field, this will display the trigger type you have selected.
- Select the Class (Form ID) from the drop-down.
- Select the Class Type (equals) to from the drop-down. This particular class will be called. This happens when the Form ID (class) with class name equals is clicked, the trigger Form Submit is called.
- Click CREATE NEW TRIGGER. The trigger Form Submit will be created. This trigger will be called when any form is submitted.
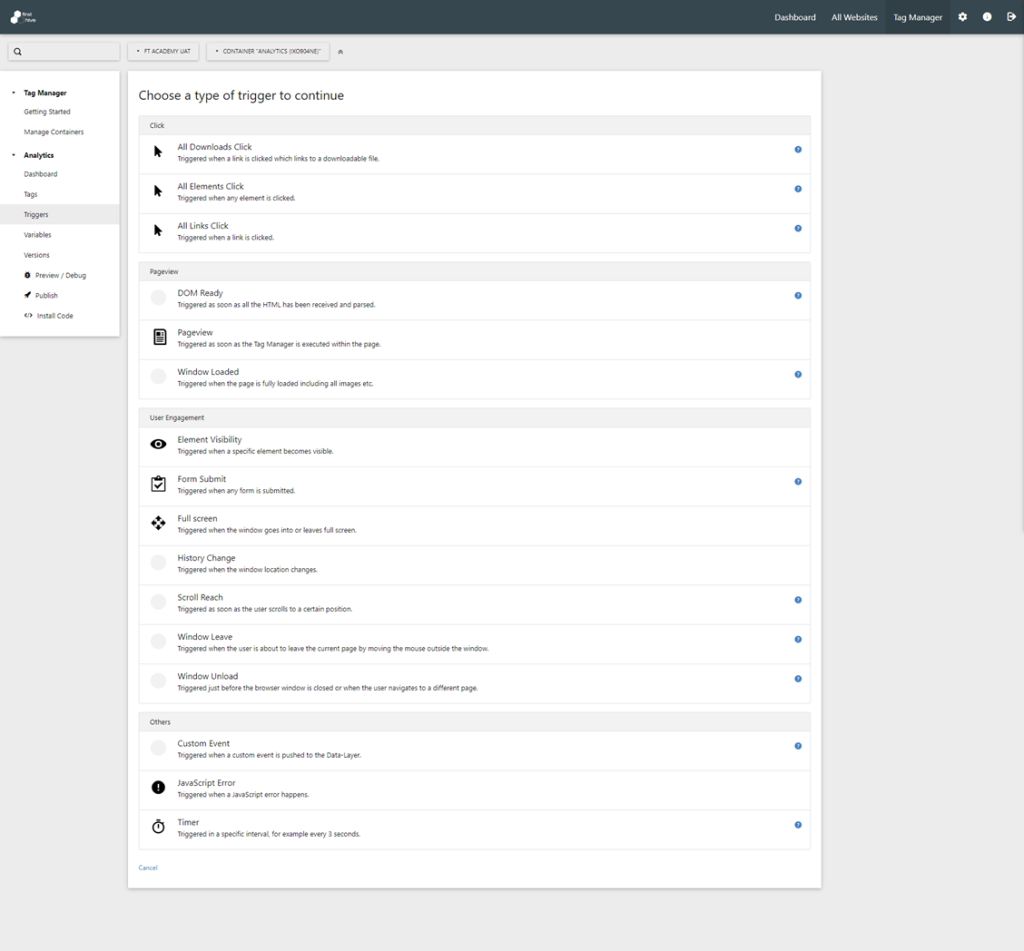
Here, you can see all the triggers in FirstHive.
- Click
- All Downloads Click
- All Element Click
- All Links Click
- Pageview
- DOM Ready
- Pageview
- Window Loaded
- User Engagement
- Element Visibility
- Form Submit
- Full Screen
- History Change
- Scroll Reach
- Window Leave
- Window Upload
- Others
- Custom Event
- JavaScript Error
- Timer
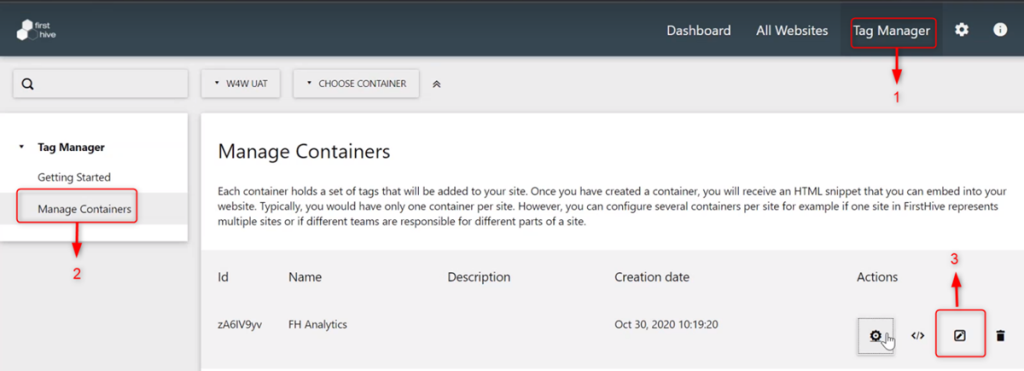
How to See the Tags and Triggers?
To see all the triggers:
- Go to Tag Manager.
- Select the customer or enter the campaign id.
- Click Manage Containers.
- Click the Settings icon under Actions.
Screen 30: Manage Containers
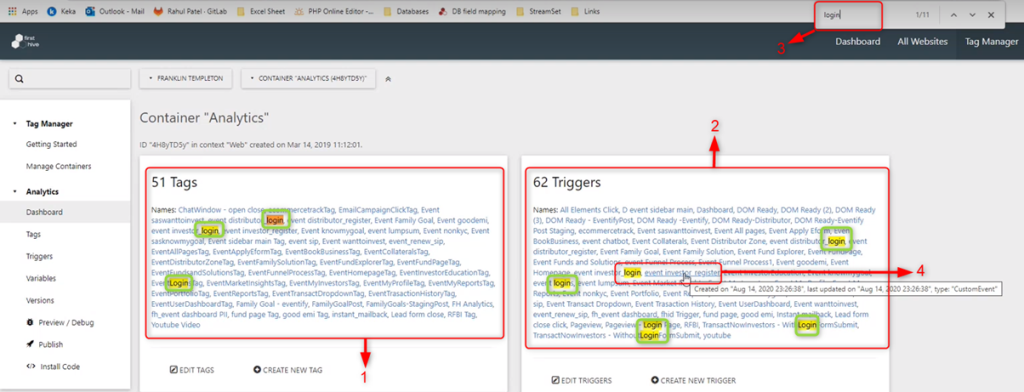
Here, you can see all the tags and triggers:
- Tags.
- Triggers.
- To see the tags and triggers, enter the search term (tag/trigger name) in the search box. For example, enter Login in the search box – this will highlight all the tags and triggers where Login is present.
- Here, you can see the Login for Investor Register is there. This is called when a login event for the Investor Register is triggered.
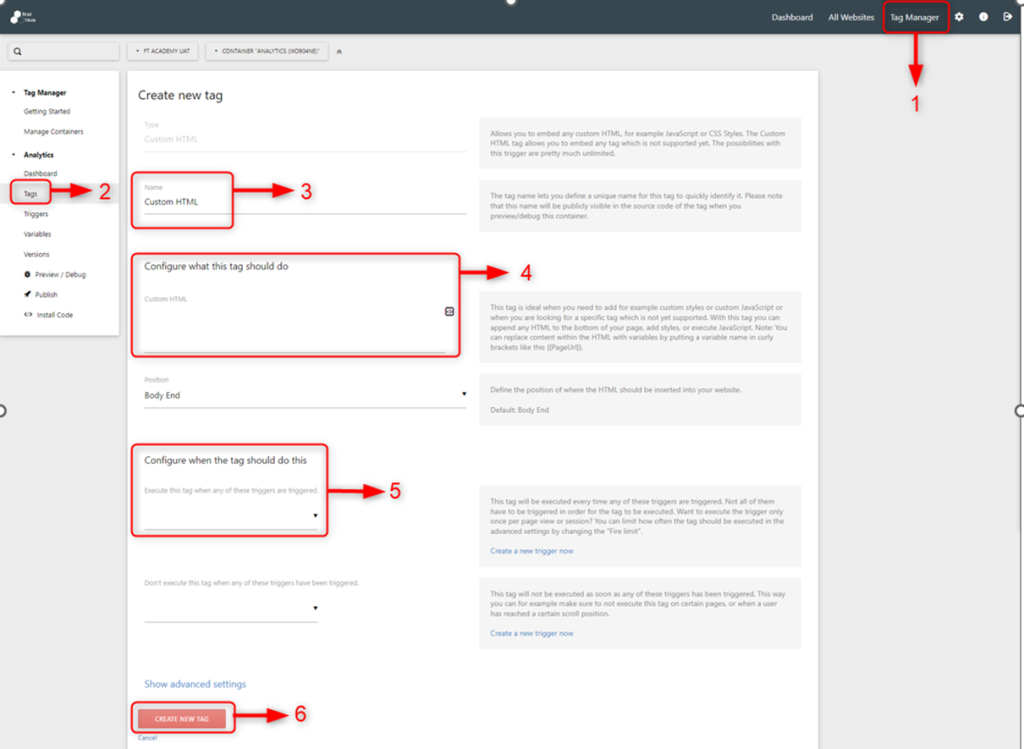
How to Create a Tag?
To create a tag:
- Go to Tag Manager.
- Select the Tag (Custom HTML).
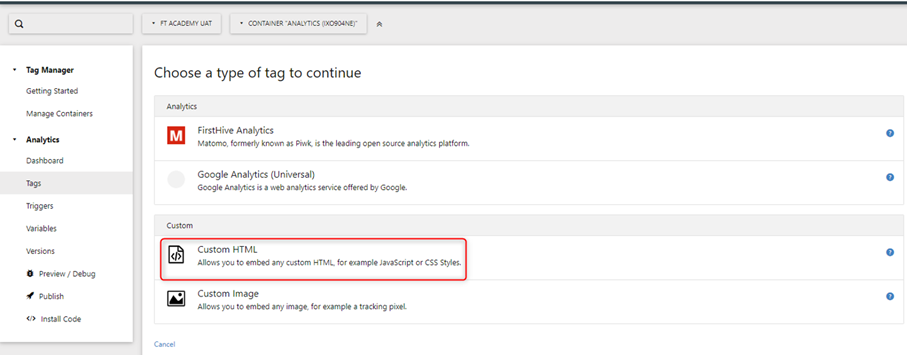
- This will show the tag name (Custom HTML).
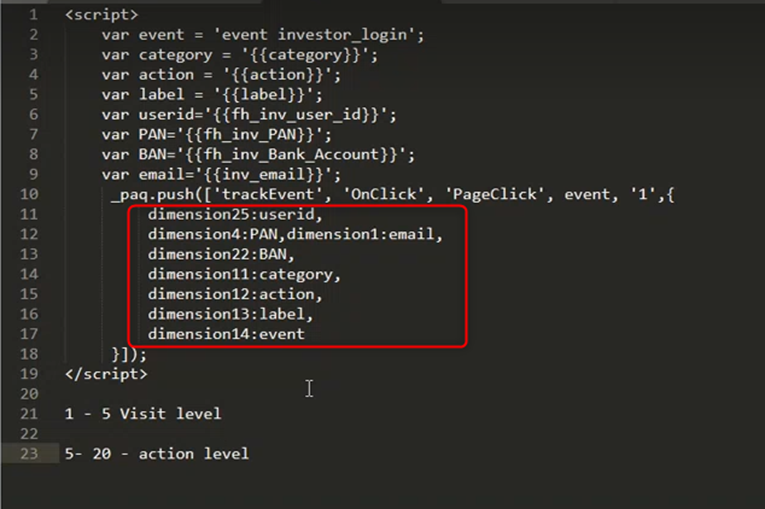
- Configure the HTML Tag by adding the script. Write this particular script:
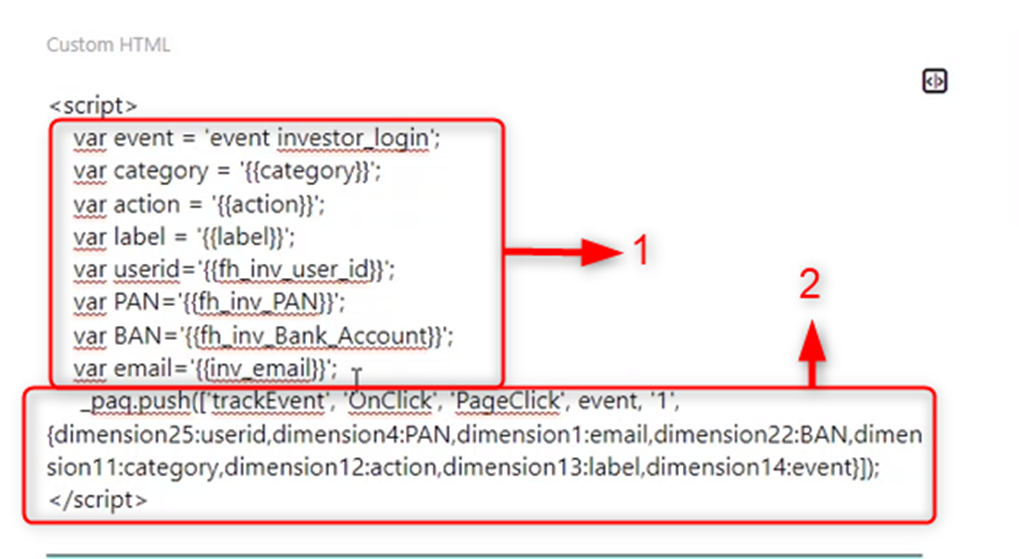
- These are the variables that need to be pushed into the attributes, it includes the data you need to store.
For example, PAN, user_id, email, Bank_Account – these things FH is capturing and putting in the variable.
- You need to pass the dimensions in _paq.push( ) as shown on the above screen.
- Configure the tags.
- Click CREATE NEW TAG. This will create a new tag.
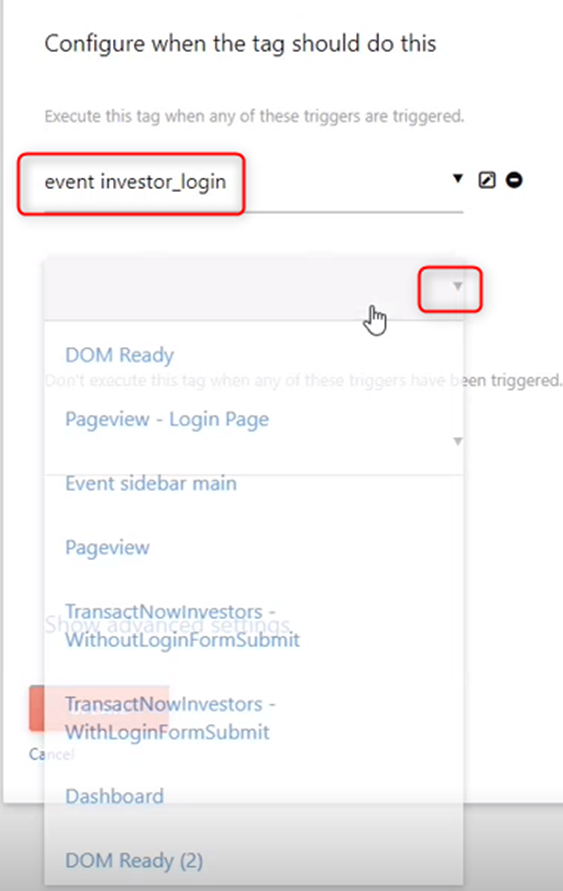
Now, for that tag (event investor_login), select the trigger to be called from the drop-down.
How to Enable eCommerce?
To enable the eCommerce:
- Go to Tag Manager.
- Select Manage Containers.
- Click Edit icon under Actions.
This takes you to the Edit Container page, where you need to Enable the eCommerce.
How to Define Tags?
There are two ways, FH can define tags to fetch the data by:
- Adding FH Eventify to Google Tag Manager (GTM) and from the DOM Elements, capture the details.
- Data Layer.
Adding FH Eventify to the Google Tag Manger
FH Eventify is placed after the Google Tag Manger (GTM)/Adobe. For example, here you can see that the GTM is placed above, while you call the FH Eventify. While calling FH Eventify, you need to put the eventify function because all data that comes into GTM is pushed from the data layer and from the data layer FH Eventify fetch/capture those data.
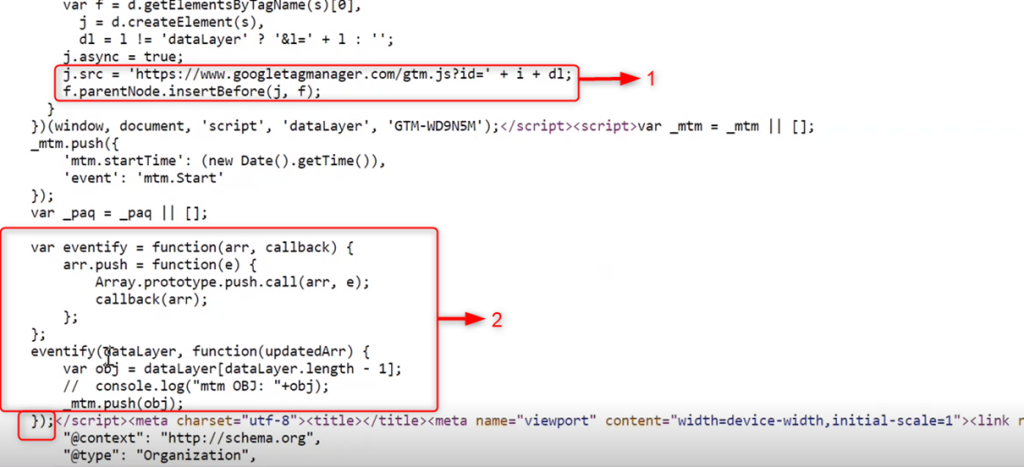
From the above screen, you can see that FirstHive is using the FH Eventify below the Google Manger Tag.
- Google Tag Manager:
| j.src = ‘http://www.googletagmanager.com/gtm.js?id=’ + I dl; f.parentNode.insertBefore(j,f); |
- FH Eventify:
| var eventify = function(arr, callback) { arr.push = function(e) { Array.prototype.push.call(arr, e); Callback(arr); }; }; eventify(dataLayer), function(updateArr) { var obj = dataLayer[dataLayer.length – 1]; // console.log(“mtm OBJ: ”+obj); _mtm.push(obj); }); |
How Do I Capture Data?
There are two ways, FirstHive captures data:
- Using DOM Element
- Through Data Layer
DOM Element
Written in JavaScript, but uses the DOM to access the page and its elements. For example, FH gets the user data from a page visit, using id or name, which is unique to that page. By adding the script in the website and from the DOM Element, FirstHive captures all the events/details.
What Do You Mean by DOM Element?
To understand the DOM Element, let’s take an example:
A user comes to hdfcfund.com and performs certain actions:
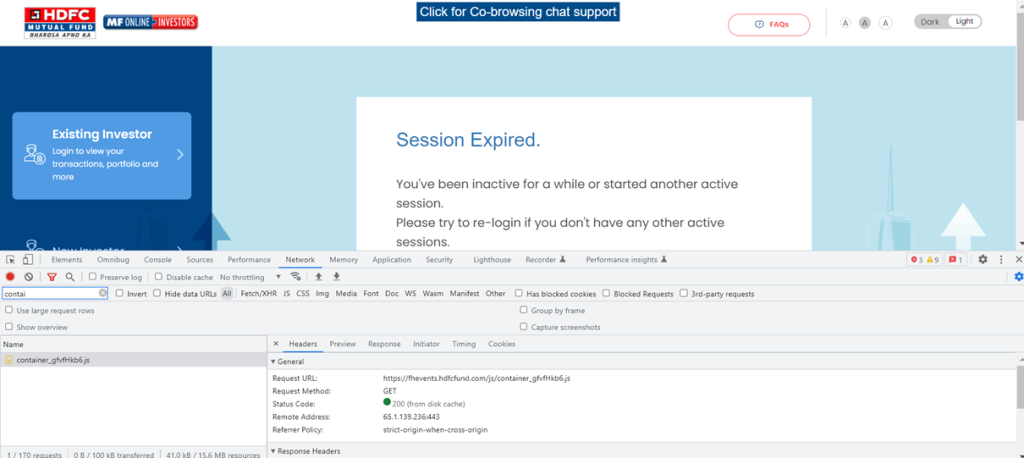
- The user goes to the Login page (no action performed the user on the login page).
- If you go to Network and search for Container/Piwik – you see there is no data push happened.
- Once the user goes to the Login page, enters User ID and Password, click Login button. This will fetch all the details, using Name and Id.
If you go to the Elements, you can see the name=”userId” and Id=”userId” have been captured.
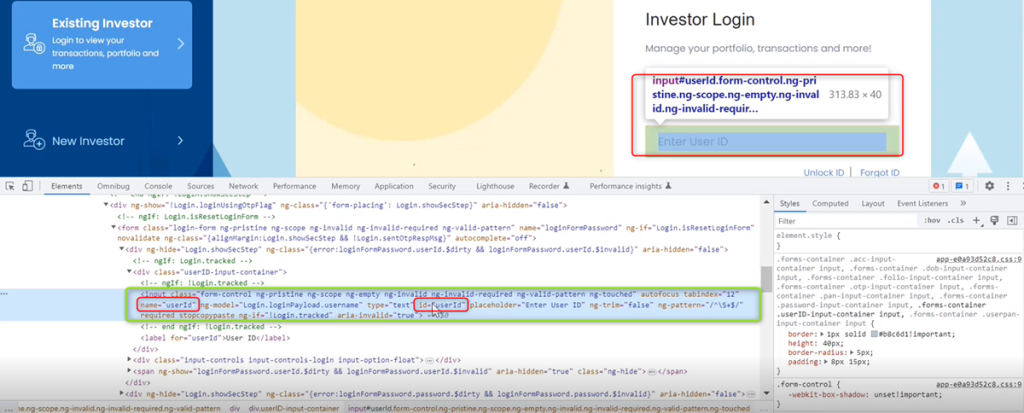
| NOTE You can either capture the events using name or Id. Capturing the details, using Id is the ideal way to go because the userId can’t be repeated on that particular page. |
Using class, the data can be captured as well but you need to make sure that the class is not repeated. For example, once you:
- Click Login button.
- You see, logInBtn – this is the class defined in the element. It may be unique for this particular page.
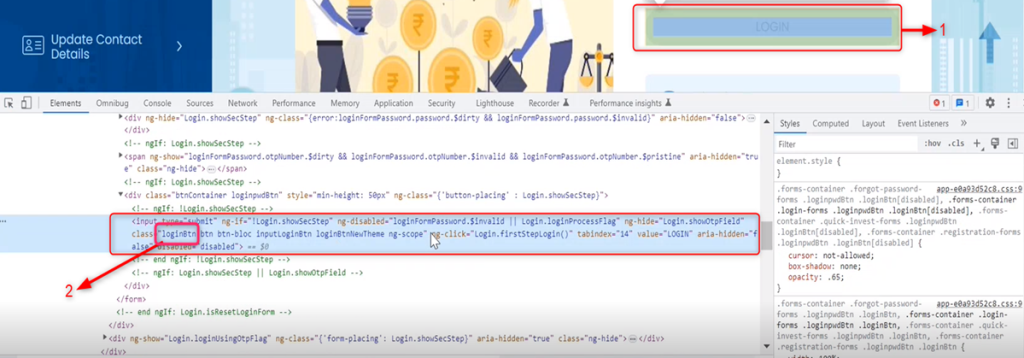
If any click event happens for this particular class (logInBtn), then it will trigger that particular form details, using the Form Id or Form Name.
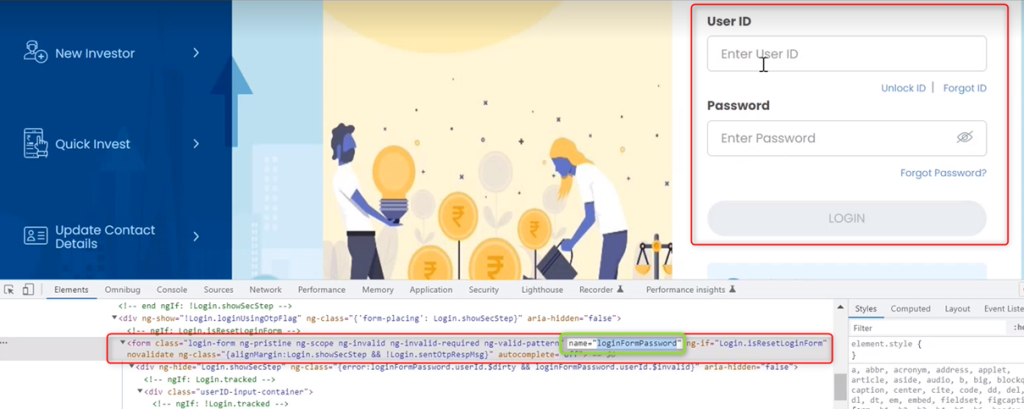
For example, when the Form Name (User ID) or login form password (Password) is submitted, then this will trigger.
| NOTE Here, FirstHive is using DOM element to capture the details. |
Data Layer
There is another way to put the tag, by capturing the events from the Data Layer. When a user login to the website, e.g., wforwoman.com – an event is added to the data layer. Then, FH team writes a trigger to capture all the information which is present inside that particular event.
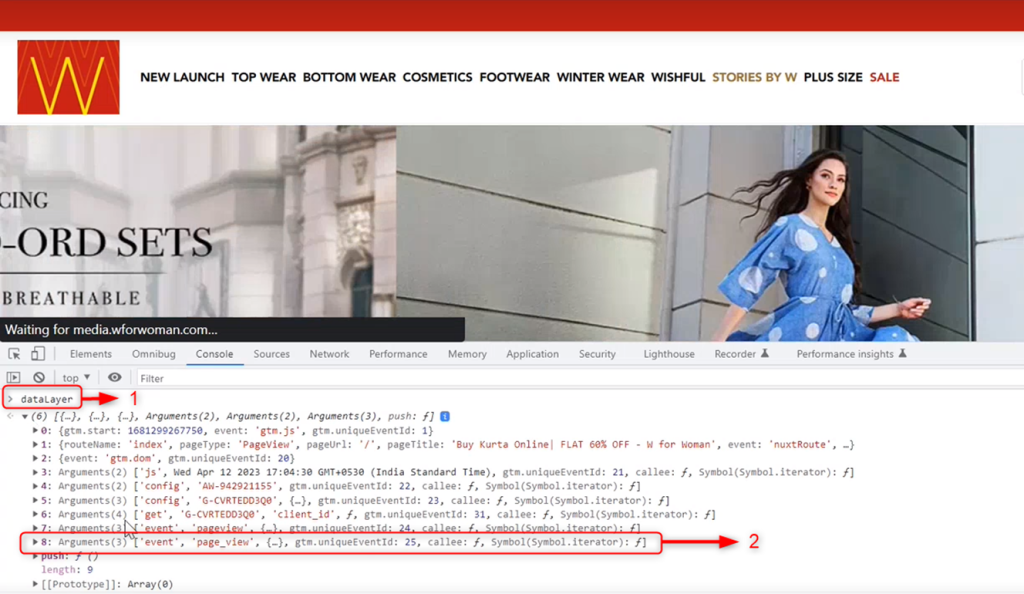
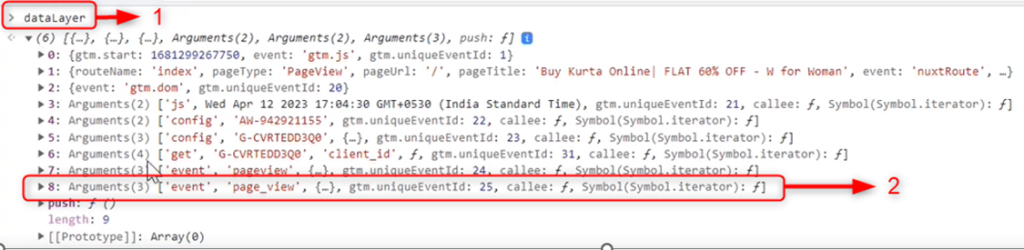
When you go to the Data Layer, you will see:
- Data Layer.
- The Event (event = page_view) added to the data layer.
Let’s take an example for better understanding:
- Go to wforwoman.com and select a product.
- Click ADD TO CART.
- Open the console, you will see that the event ‘addToCart’ is called.
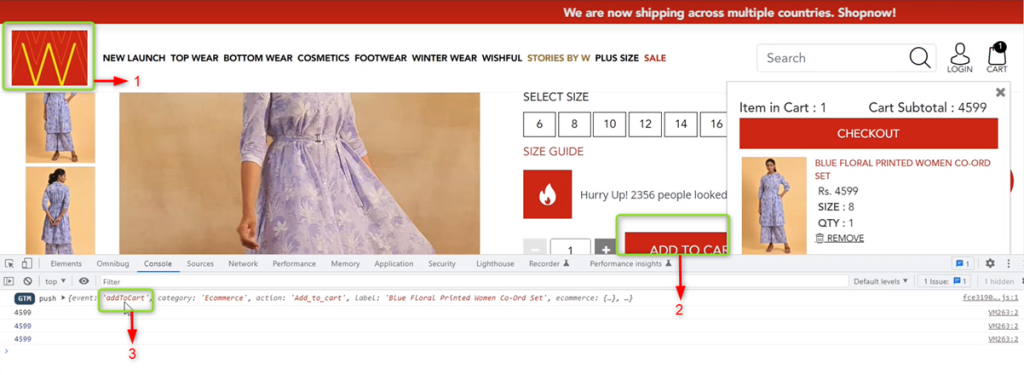
When Add To Cart is pushed into the Data Layer this particular is trigger called.
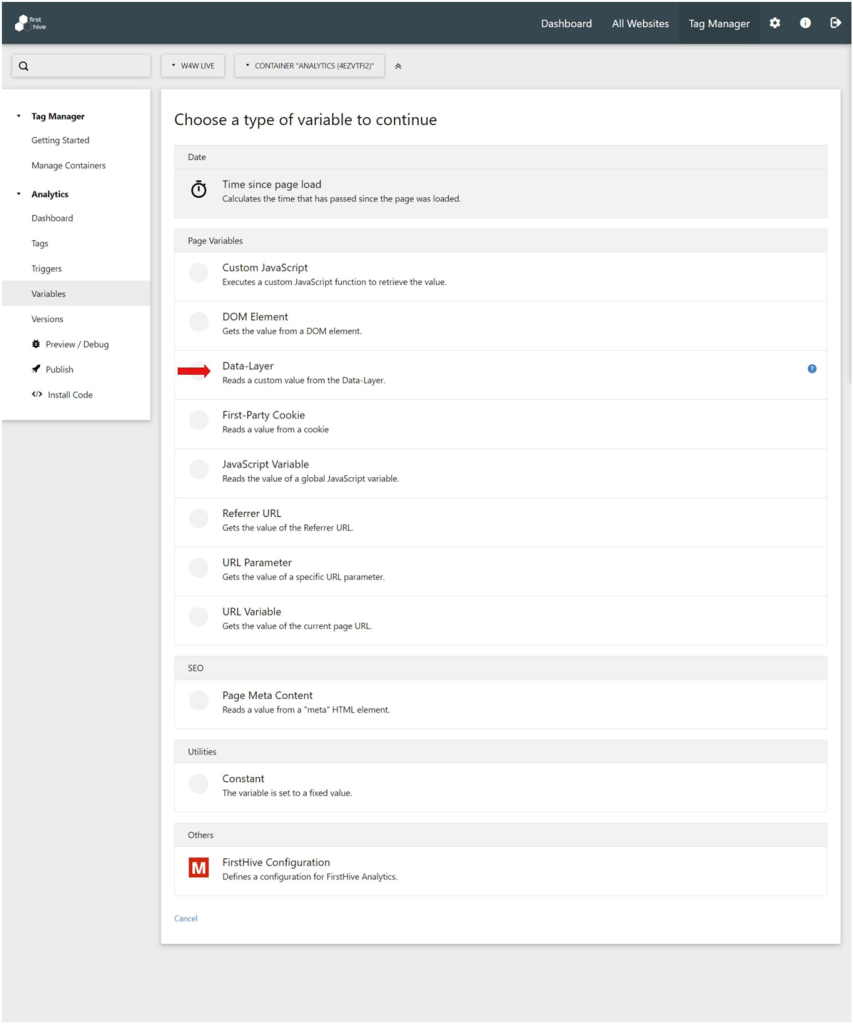
How to Create Variables?
These are the list of variables available in FirstHive:
- Custom JavaScript
- DOM Element
- Data Layer
- First-Party Cookie
- JavaScript Variable
- Referrer URL
- URL Parameter
- URL Variable
You need to choose a particular variable type in order to continue. For example, if you want to capture the value of variable events, using Data Layer, then you have to select the Data Layer.
This takes you to Edit Variable page, where you need to:
- Enter the variable name as Event.
- Put the Data Layer Variable Name is Event.
- Click Update.
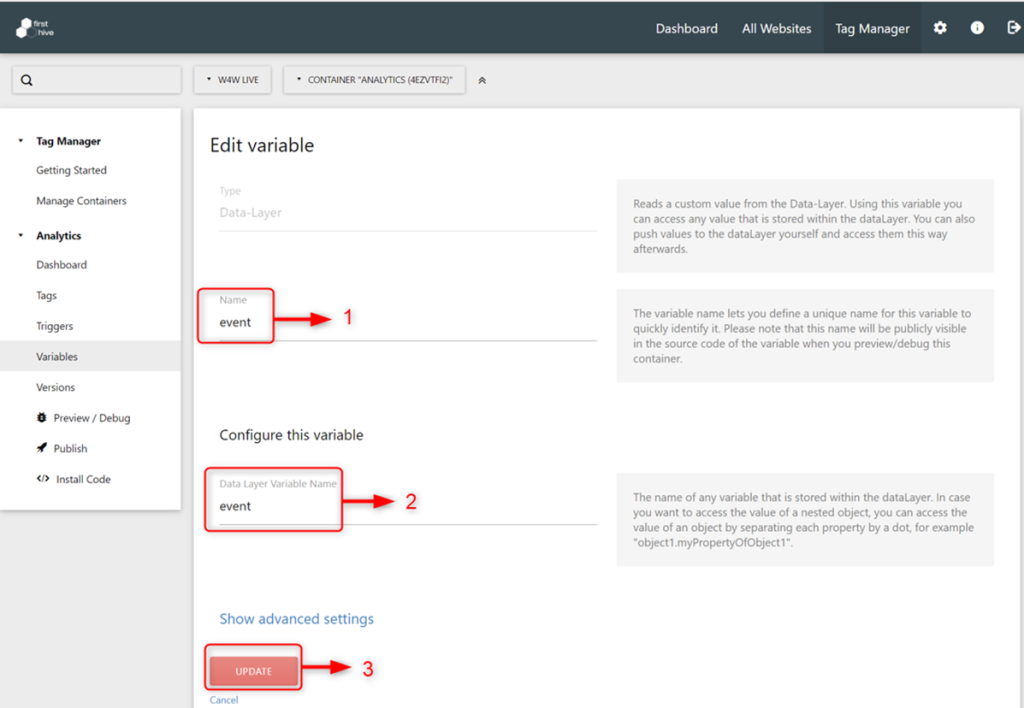
This will capture the value of variable events present in the Data Layer.
| NOTE Please refer to Screen 42: Data Layer for better understanding. |
Popups
To integrate the Popup (WebPush), you need to create a campaign first. Once the FirstHive tags are placed, there are two things which will be running in the website:
- Script
- Response
| NOTE Push Notifications do not work properly for http (non-secure) sites. |
For example, let’s take the hdfcfund.com. For this page, FH has the script running in backend that checks for the Popup. To see how the process is taking place, you need follow the steps mentioned below:
- Go to Network.
- Search fh popup in the search box.
- This will display the container, piwik, main, and fh_popup. When you click fh_popup this will show:
- Headers
- Payload
- Preview
- Response, etc.
- Click Preview to view the script. This particular script will be called on each page interaction to check any webpush is there for this particular page.

| NOTE In the Response section, you will have the event. If the Response section is empty or no response found, then there is no WebPush event. |
To check the Webpush event, go to hdfcfund.com:
- Click Wealth Creation under Goal Based Solutions tab.
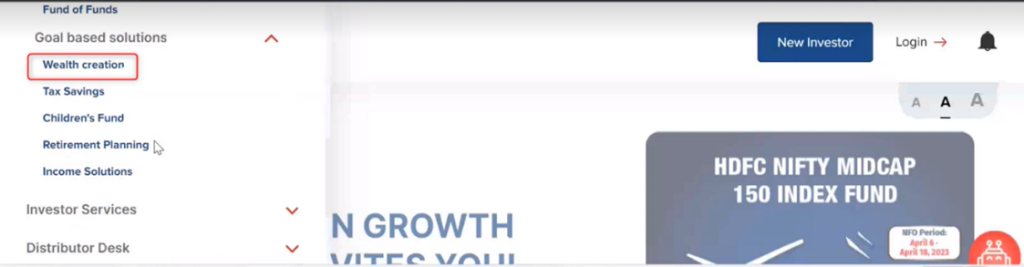
This takes you the Wealth Creation page, where you will see a Popup coming.
- You can see the Popup because for this page the webpush event is configured.
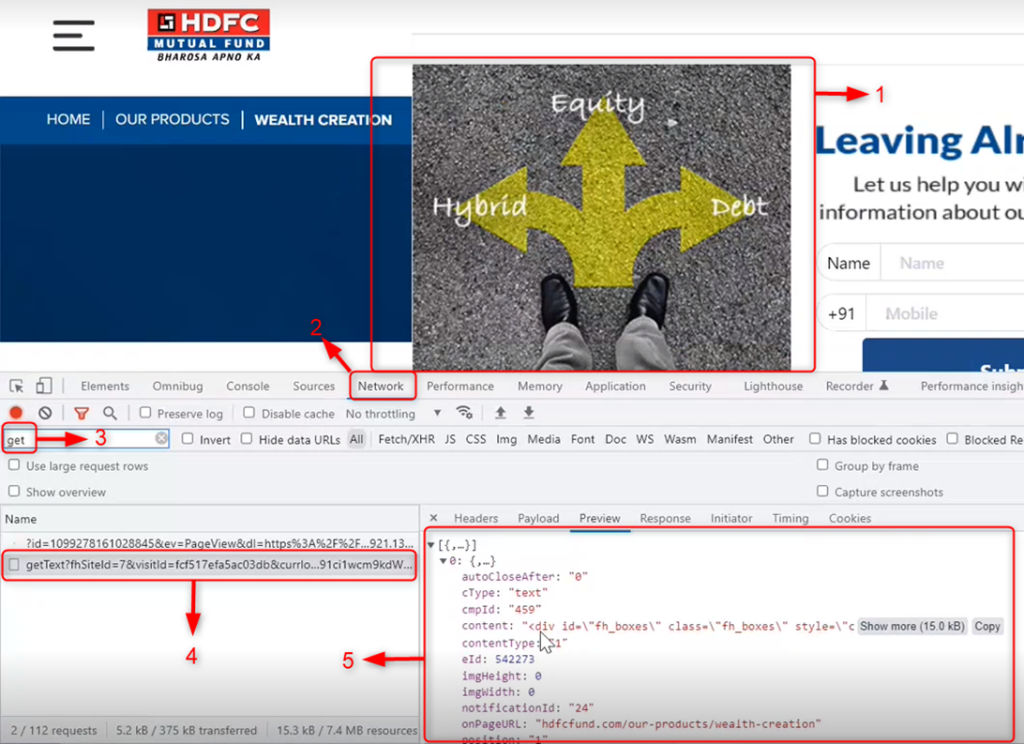
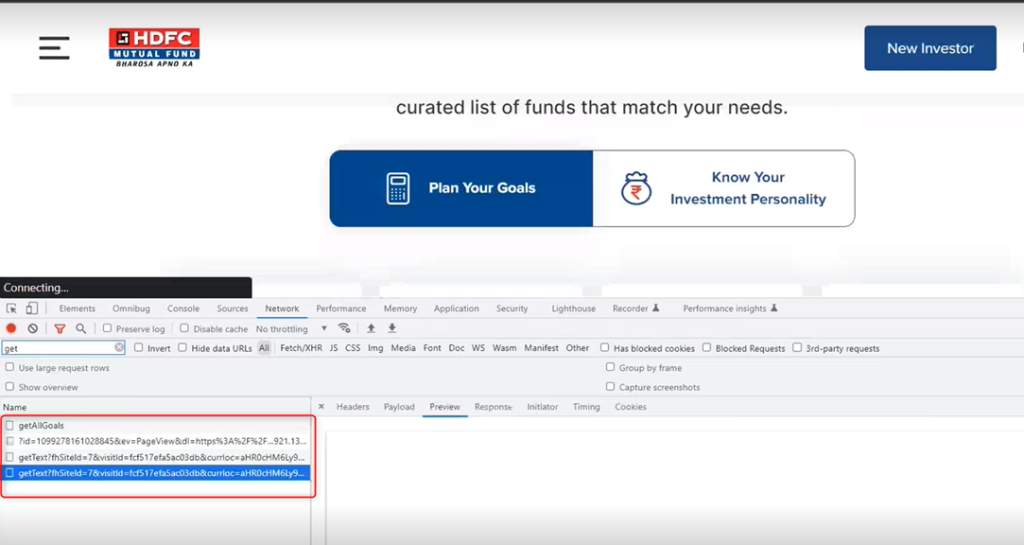
- Click Network.
- Search getText in the search box.
- Click getText.
- Go to Preview, you see all the details that include, Campaign ID, Content, Notification ID, etc.
At the same time, if you go to any other pages, you won’t get to see details showing in the Preview (getText) section because there is no active campaign for this page.
How to Push a Campaign
There are two things to consider while pushing a campaign:
- Webpush: The push notification that comes when you visit a webpage.
- Web Banner: The web banner that appear on a particular page
Steps to Create Web Push Campaign
Step 1: Go to Campaigns, create a campaign.
Step 2: Select WebPush.

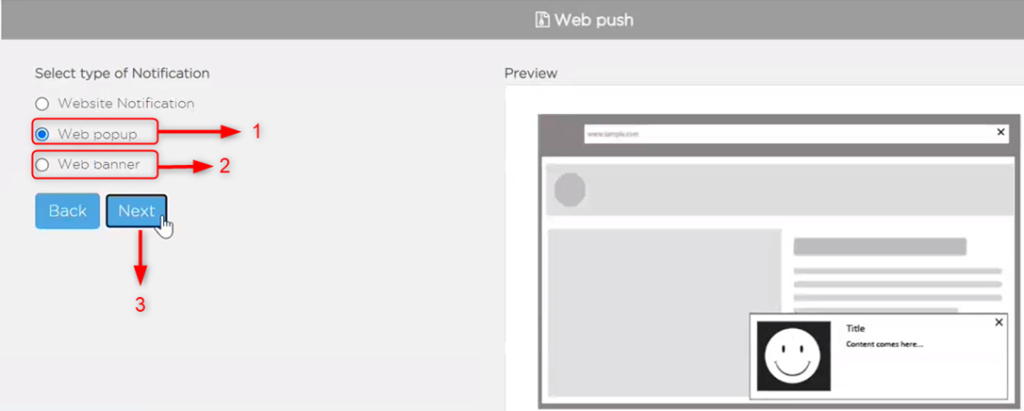
Step 3: This takes you to the Web Push Preview page, where you will have two options to choose from (Website Notification is not considered here).
- Web Popup – Select Web Popup for Popup notification (here, we have selected Web Popup).
- Web Banner – Select Web Banner to personalize the banner.
- Click Next.
This takes you the next page, where you need to fill-up the following details:
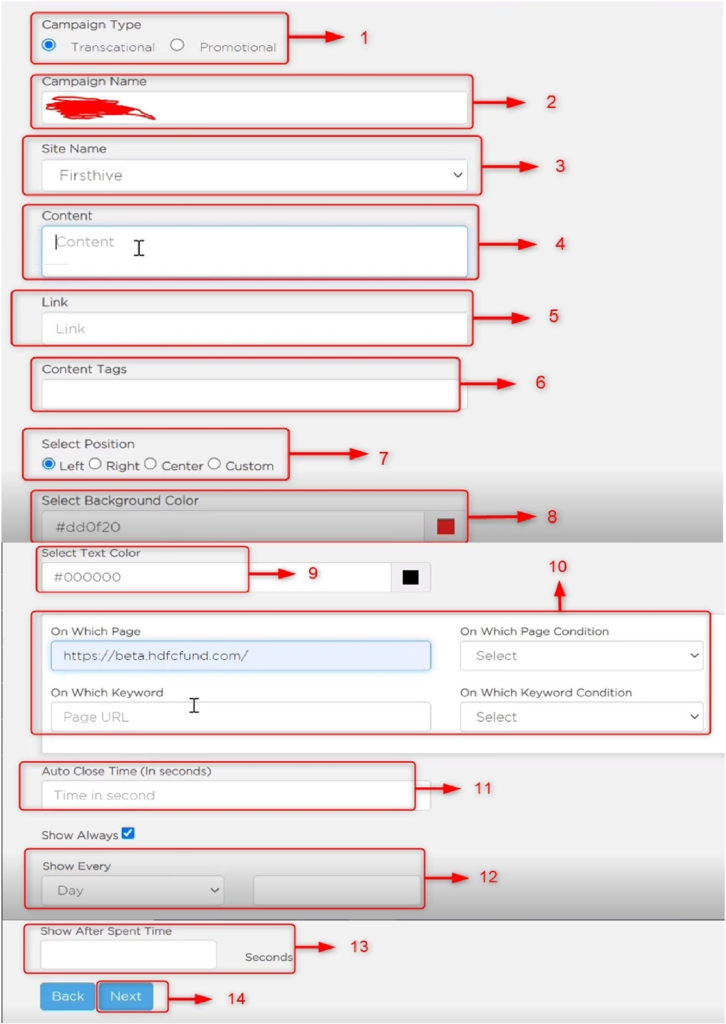
- Select Campaign Type, whether it is a transactional or promotional – you need to mention.
- Enter the Campaign Name.
- Enter the website name (on which site you want the notification to popup) in the Site Name field.
- In the Content field, enter the content that you want to display.
- Enter the Website link in the Link field.
- Enter tags for the content.
- Select the position, where you want the popup to be shown to the visitor.
- Select the back ground color.
- Select the color for the text.
- Put all the details for the page on which popup will appear and all the conditions applied.
| NOTE On Which Page Condition, you will find three conditions out of which you have select one: Is: This condition is applied when the page URL is exact match to that of the Popup URL page (on Which Page URL). For example, the Popup page URL is http://beta.hdfcfund.com/ and site URL is also same http://beta.hdfcfund.com/Contains: This condition is applied when the Popup page URL (on Which Page URL) contains some parameters of the site URL. For example, the Popup page URL is http://beta.hdfcfund.comw/ealthcreation/ and site URL is http://beta.hdfcfund.com/. Here, you can see the popup url contains some the parameters of the site url. Does Not Contain: This condition is applied when none of the parameters from the site url match with that of Popup url (on Which Page URL). |
- In the Auto Close Time (In Seconds) field, enter the time after which the popup will be automatically closed.
- In the Show Every filed, select the days, month or year for which you want the popup to be shown, Here, you also have the option to select how many times a day the popup will appear. For example, you can select how many times and at what stage the popup shall appear. Whether this should appear every time a user comes to the website or only once (if that user comes for the second session, the popup won’t appear), likewise. If you put 1, then the popup will appear once in a day no matter how many times a user comes to that site in that day.
- In the Show After Spent Time field, enter the time after which the popup will appear on the screen. This indicates after how many seconds (starting from the user session), the popup will appear.
- Click Next.
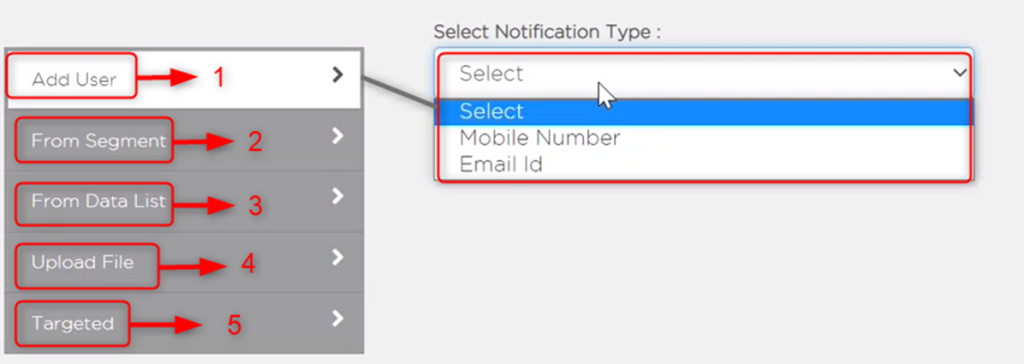
This takes you to Web Popup page, where you can:
- Add User (specific users) by selecting the Mobile Number/Email Id from the drop-down (FH captures certain PII information such as; mobile, email id when a user visits website). You can either send notification to specific mobile numbers or email ids, by entering the Mobile Number/Email ID in Comma Separated format. Then, enter the Data List name.
- You can select From Segment drop-down.
- You can select From Data List drop-down.
- You can Upload File.
- You can select Targeted visitors to whom the popup notification will go. There will two option available:
- All Visitors: This will select all the visitors from the data list or segment.
- Select Visitors: You can select specific visitors.
When you click Next, this will display:
- Preview of the Popup that you have created.
- If you click Execute/Schedule for Later, this is exactly how the Popup will be shown in the website.
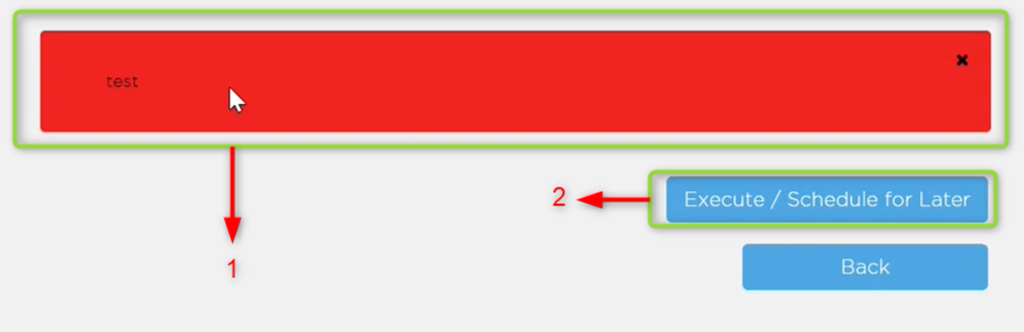
| Important The only drawback is you can’t customize the Popup here. To customize the Popup, you need to configure it from the backend. |
How to Enable One Page Personalization?
To customize the Popup, follow the steps mentioned below:
Go to:
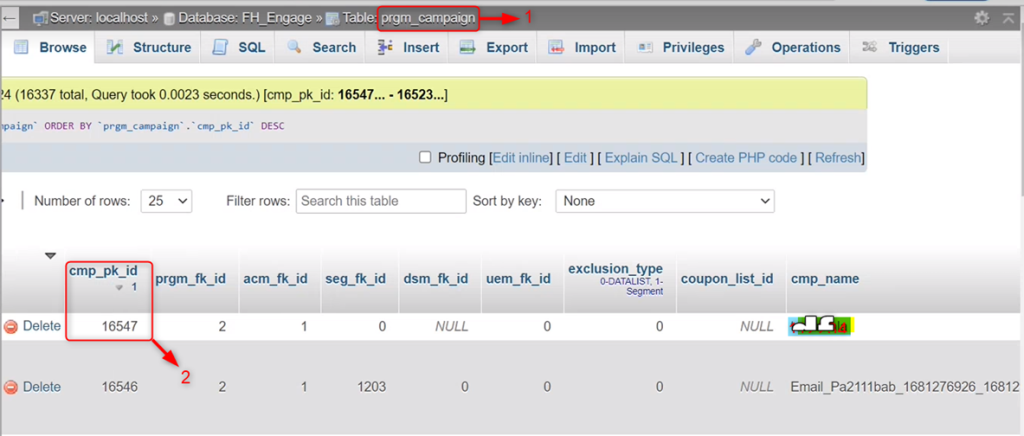
- The Program Campaign (prgm_campaign) table.
- Copy the campaign id (cmp_pk__id = 16547) of the campaign (cmp_name) that you have created.

Now,
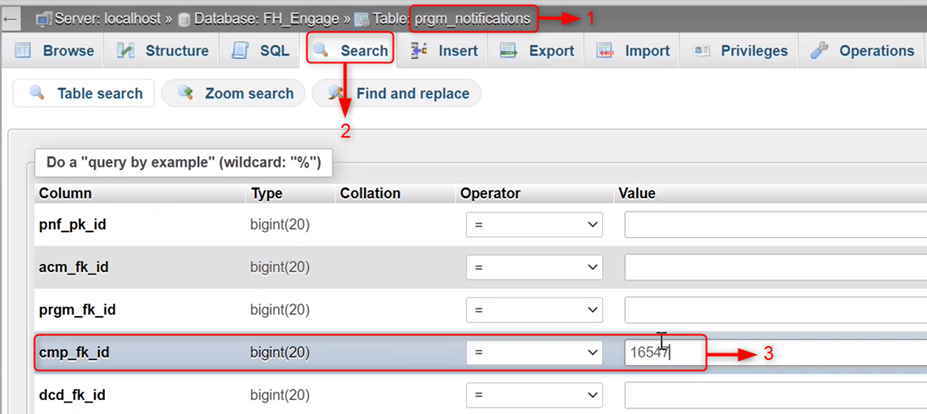
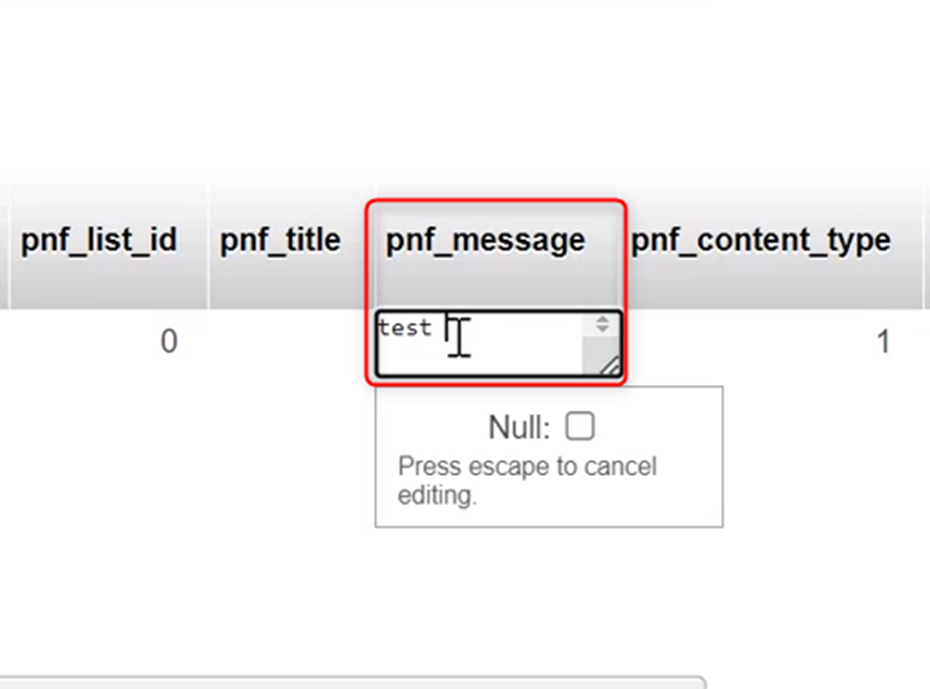
- Go to table Program Notification table (prgm_notifications).
- Click Search.
- In the cmp_fk_id column and paste the campaign id (cmp_pk__id = 16547) in the value section and click enter.
If you want to display the customized html popup, then go to pnf_message column and there you can change the content and customize the Popup.

Now, go to the previous page (Refer to Screen Number: 51) and refresh it, you’ll see the Popup has been updated.
How to Enable Dynamic Personalization (One Page & Multipage)
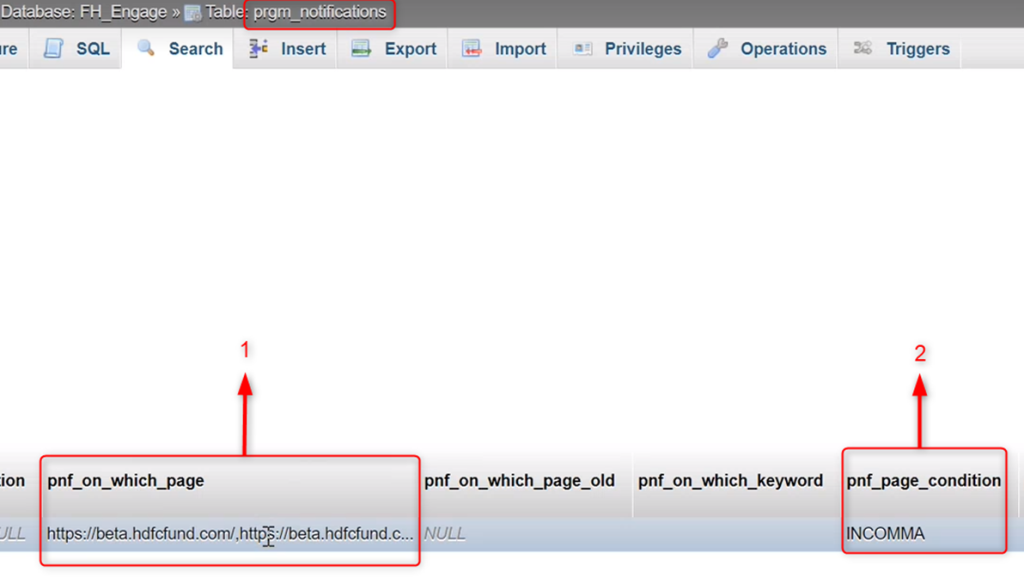
If you want to configure the Dynamic Popup (for multiple pages), then go to prgm_notifications table:
- On pnf_on_which_page column, enter the page URLs.
- On pnf_page_condition, insert INCOMMA.
For Web Banner
For Web Banner, follow the steps mentioned above, and to customize the web banner, use this JavaScript.
| $(document).ready(function($) {$(‘.carouselSection .section-inner-txt .carousel-inner .carousel-item’).each(function(index, element) {if(index===0) $(this).html(content); }); $(‘.carouselSection .section-inner-txt .carousel-inner .carousel-item’).removeClass(‘active’); $(‘.carouselSection .section-inner-txt .carousel-indicators li’).removeClass(‘active’); $(‘.carouselSection .section-inner-txt .carousel-inner .carousel-item:first’).addClass(‘active’); $(‘.carouselSection .section-inner-txt .carousel-indicators > li’).first().addClass(‘active’); }) |
Go to:
- The Program Campaign (prgm_campaign) table.
- Copy the campaign id (cmp_pk__id) of the campaign (cmp_name) that you have created.
Now,
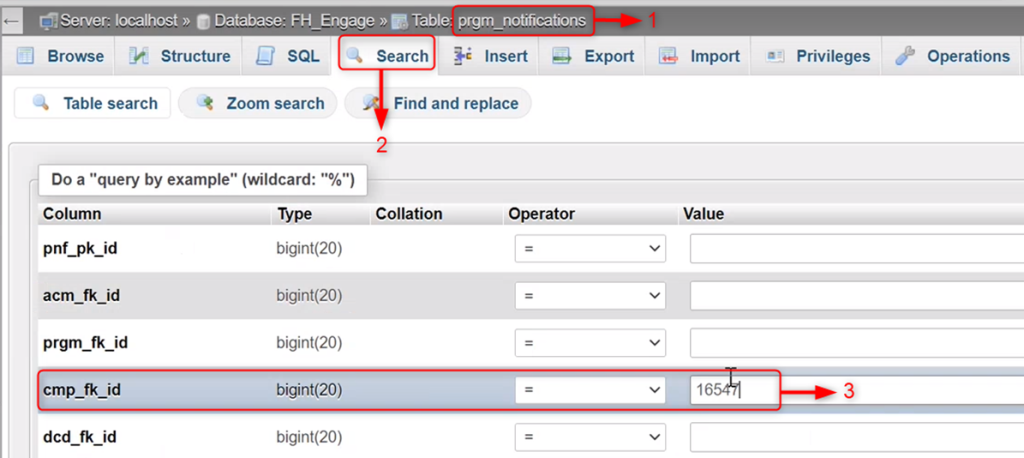
- Go to table Program Notification table (prgm_notifications).
- Click Search.
- In the cmp_fk_id column and paste the campaign id (cmp_pk__id = 16547) in the value section and click enter.
Go to prgm_notifications table and put this code (JavaScript) in pnf_message column.
| Important You need to perform the steps mentioned above for Web Popup. |
Continue from Where You Left
| NOTE This feature is not implemented for any client. This feature is to be implemented only for RoyalSundaram (RS), which is under progress. Once the integration process gets completed, the team will update. |
As of now for the understanding purpose, we can take an example, how exactly this feature will work:
- You go to a hotel’s website and click Stays.
- You put all the required information such as, the city in which you are looking for the stay, the number of days you are planning to stay (from date – to date), and for how many people, etc., but you left the website without completing the booking process or making payment.
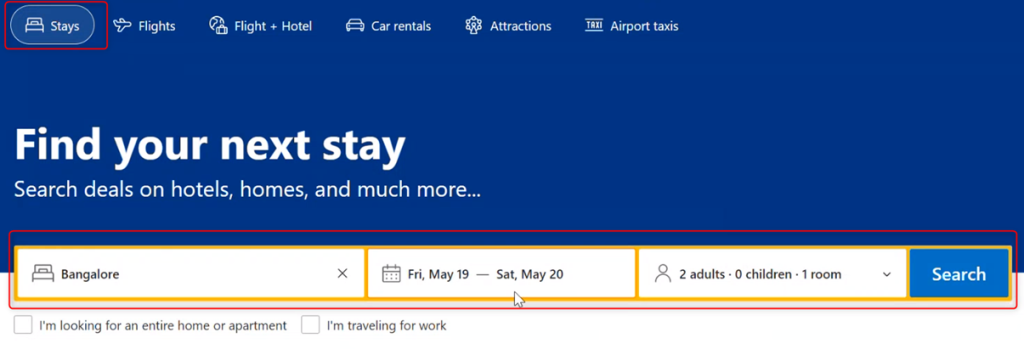
- The very next time, you come to that website/page, all your information will be auto-filled by the website itself.
- Like that only, FirstHive updates the drop-out campaigns.
Key Points
A few implantations need to be done from the client side:
- Either the clients have to store all the information in a session or FirstHive will send all the information though the URL, which they need to capture and populate in their website.
- Another way is, FirstHive will send some simple communication through the campaign to those users who have dropped out from a particular page such as; please continue or complete the checkout.
In every 5 minutes the campaign checks, whether any new person has dropped out without making the payment or completing the checkout process.
| Important The buffer time is 5 minute – from one step to another (depending on the client.) FirstHive checks in every 5 minutes, whether the user has moved to next page or not. If the user doesn’t move to the next page within 5 minutes, then FH considers it as dropped out. The very next time that user comes to the website, all the information that he/she had previously entered will be auto filled. |